How To Start A Profitable Blog In India (2024)? – A Step-By-Step Guide
Starting a blog is EASY!
And I am not kidding a bit.
However, to start a profitable blog takes a hell lot of time, energy, and proven tactics that many pro bloggers use to earn good money from their blog.
So, want to know how to start a profitable blog in India? If yes then we have got you covered in this step-by-step guide.
Let’s dive right in.
What is a blog?
A blog is an online web journal or an informational website where people present their thoughts or opinions about one or more topics.
However, in today’s time blog has become more than a hub where you present your thoughts and opinions.
Rather it has become a medium to get traffic and leads for your business.
In 2021 more than 600 million blogs are up on the internet and the number of bloggers in the USA alone is 31.7 million.

These stats tell how businesses and individuals are actively using this medium to drive sales and recurring income to their pockets.
People have blogs on various topics such as:
First, find a topic which you are interested in, see if it is profitable or not, and if it is profitable then start your very own blog.
Simple!
What is blogging?
Back in the day blogging was just a process of writing and updating your blog post which you do either by yourself or hire a writer for that.
However, the scene has completely turned upside down because now blogging is not just a mere process of writing blogs all day.
Instead, it is a collection of various things such as managing your blog, fixing errors of your blog, doing SEO for your blog, publishing content on your blog, internal linking your articles, and more.
It might sound overwhelming at first but when you do it regularly then it would be a piece of cake for you.
Who is a blogger?
A blogger is a person who wants to share his or her thoughts on different topics with the online world.
You can either do blogging just for the fun or you can do it to earn a good amount of money as well.
And there is a huge difference between both types of bloggers.
The first one just has to write their blog, do the basic SEO optimization, fix errors on their website and that’s it.
However, the latter one has to do a lot of tasks such as writing the blog post, updating it so that it would remain fresh, fixing technical errors in your website, designing your website, and a lot more.
You have to really work hard on your blog to make money through it.
And that is the thing which you have to put in your mind before getting into this field.
How does the blog work?
Working on a blog is not rocket science. First, you pick a topic of your interest that is profitable as well to start a blog on.
After that, you have to choose which platform you are going to use to start your blog.
Whether it is blogger or WordPress or any other CMS (Content management system) out there.
Next, you write various posts about that topic and update the old ones to add a touch of freshness to them.
As your blog would grow you would see your blogs arranged in reverse chronological order from oldest to newest either on your blog page or on your homepage like mine.
After that, you have to learn the art of ranking your blog posts by internal linking, backlinks, social sharing, indexing, and more.
Also, you have to arrange your blog post based on different categories and tags.
Next, you have to design your website’s homepage, menu, footer, sidebar, and more to make it look beautiful.
And that’s how a blog works.
Why you should start a blog in 2024? (5 Reasons to start a blog in India)
Blogging is the best decision that I have taken in my life!
It has helped me discover my passion and given me the freedom of doing whatever I want to do in my life.
So, here are five benefits why you should start your blog in 2024:
1. Enhance your grip on English or any other language
Blogging is a great way to gain mastery over English or any other language.
I too have improved my grip over the English language by writing blogs regularly.
Also, it has been found in a study that blogging can enhance your language skills.
So, start a blog if you want to learn a new language fast.
2. It can help you escape 9 to 5 and attain financial freedom
Are you in a job that you don’t want to be a part of?
If yes then try blogging because it is a great way to escape your boring 9 to 5 job and attain financial freedom.
However, I must tell you to do that you have to remain consistent and put a lot of effort into your blog to earn money from it.
And after that, you can live the life of your dreams.
3. Build your rapport and tribe online
Blogging is a great way if you want to build your rapport in the online world without spending 1000s of dollars on paid ads.
For that you have to be active on social media, connect with other bloggers, post regularly, help others and that’s how you can make your digital tribe
Many bloggers like Harsh Agarwal, Sumit Sao, Mangesh Bhardwaj have made their own tribe through blogging.
4. Helps you build your confidence and share your thoughts online
Are you an introvert guy like me who can’t put his or her thoughts in front of others?
If yes then blogging can help you achieve that easily.
Personally, I was a guy who had no confidence but then I started my blog where I shared my opinions and from then I feel much more confident.
Also, it has been proven from a study that blogging can improve your confidence
5. Helps you easily become the master of the subject
Blogging is not just a mere copy-paste task where you copy some text from your competitor’s website and paste it into yours.
It is a task where you have to do a lot of research before writing a particular part of your blog.
And this extensive research can help you get immense knowledge of that topic which would definitely make you a master in that topic.
Note – Sorry for disturbing you! Bookmark this page if you don’t want to read this huge guide in one shot!
Can you make really make money from blogging?
This is a question that every newbie asks before entering this world of blogging.
So, to clear your confusion here are the earning reports of some pro bloggers who are making big with blogging:
1. Anil Agarwal
As you might know, Anil Agarwal is a famous blogger who majorly blogs at bloggerspassion.com.
In the year 2020 Bloggerspassion has generated more than 7 lakh visitors on their blog.

And made more than $140,298 in the year 2020 (which means that they have generated more than $10,000 every month)
Here is his income report

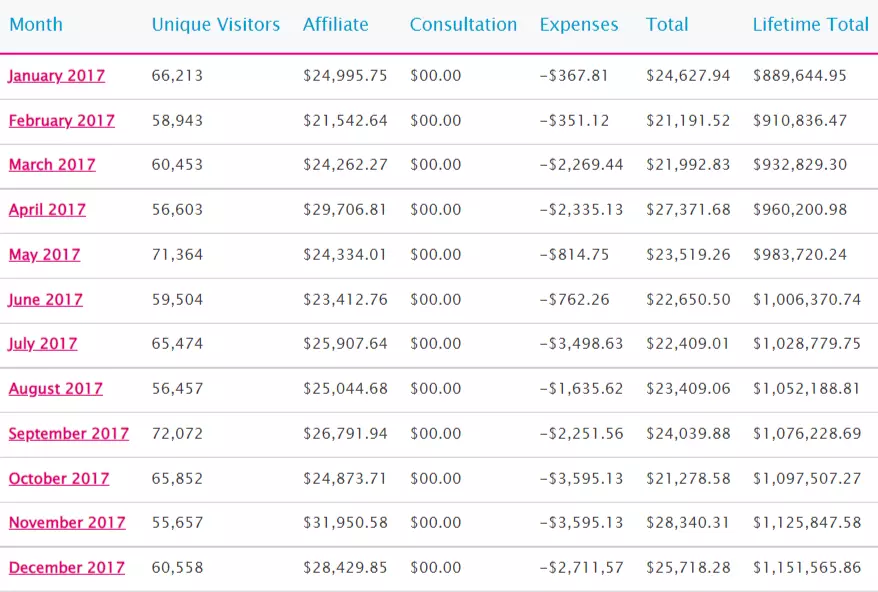
2. Pat Flynn
Pat Flynn is a popular internet marketer who is making super big with a lot of things on the internet such as affiliate marketing, podcasts, YouTube, and more.
He has published his last income report in December 2017 where he has revealed that he has earned a freaking $166,559 in a single month.
And if we cut out the expenses then the earning would be $125,819 in a single month.

Which is huge? Isn’t it.
3. Matthew Woodward
Matthew Woodward is a popular blogger and internet marketer who gives his valuable SEO, blogging, and internet marketing tips at matthewwoodward.co.uk.
His blog is popular for its in-depth SEO guides and case studies which are loved by bloggers as well as SEO professionals.
Similar to Pat Flynn Matthew has stopped publishing his income report after December 2017.
In his last income report, he has revealed that he has earned more than $25,000 in the single month of December 2017.
4. Harsh Agarwal
Last but not least is the income report of Harsh Agarwal who is a popular blogger from India who blogs at shoutmeloud.com.
Here is the income report graph of Shoutmeloud from Feb 2009 to July 2017.

As you can see that Shoutmeloud is earning more than $10,000 every single month since March 2015.
But remember one thing that all these blogs are up on the internet for more than 10 years.
Its owners have worked their level best to provide great content to their readers and that is the reason why these blogs are making that much.
So, instead of focussing on the money aspect all the time focus on providing value to your readers first.
Essential things needed to start a blog
You can buy a hell lot of products for your blog and your lust for more products won’t end ever.
However, most of these products are not really essential for the proper working of your blog which means that it is a complete waste of money especially if you are just starting out.
So, here are some essential things you should definitely invest in for starting your profitable blog:
How much does it cost to start a blog?
Depending upon your needs the cost for starting a blog can be different for different people.
However, the basic things for starting a blog are fast hosting and domain, a theme for your blog, and a great caching plugin.
So, let’s now estimate the total cost of starting a blog.
First, you need great hosting and domain, I recommend Premium shared hosting from Hostinger which would cost you around 3,500 rupees for 1 year.
You would get a free domain and SSL with this plan so it would save some of your bucks.
Next is a great theme for your blog, I recommend the Kadence theme which is super lightweight, fast, and good-looking.
I can guarantee you that if you use this theme then you won’t need any developer to make your website look great.
You can go with its premium version if you want to harness the true potential of this theme.
However, if you don’t have a budget then you can go with its free version which is feature-packed too.
And at last, a caching plugin to make your website fast I recommend WP Rocket as it can make your website super fast in a matter of clicks.
So, here is the cost estimation of making a blog in India:
3500 rupees (Hosting + Domain) + 0 rupees (WordPress theme) + 3,644 rupees (WP Rocket)
Total cost = 7,144 rupees.
How to start a blog in India 2024? – A Definitive guide for beginners
Step 1 – Choose the right blogging niche for yourself
Finding a great blog niche in which you have the passion to write is really essential because it helps you make your blog successful without getting bored from it in the midway.
Previously I had started a blog on gaming just because I had found a profitable micro-niche in it.
However, I wasn’t able to make it successful because I didn’t have any interest in that topic which I was writing on.
And that is the reason despite starting a blog in a low competitive micro-niche I wasn’t able to make it successful and drive profits from it.
So, always remember that start a blog on a topic that you really have an interest in despite the competition.
Yes, if you are starting a blog in a competitive space then it would take you more time than in a low competitive niche but the results would be super fruitful.
For example, I had started this blog on blogging because I had an interest and passion for this topic despite the huge competition present in this niche.
Here are some more blog niche finding tips for you:
1. Focus on a single topic at a time
This is a personal mistake that I had done when I first started this blog (At that time it was lightworldwide.com) that I focussed on a lot of topics such as SEO, Blogging, Social media, and more.
This resulted in no success so after realizing that I focussed only on the blogging niche which I am covering in this blog.
So, the moral of the story is that if you want to start a blog on a competitive niche then try to niche it down and blog on a single topic when you are just starting out.
And when you start getting rankings, organic traffic, and sales to your blog then you can start expanding your niche slowly and steadily.
For example, if you are going to start a blog on gaming accessories then start a blog that covers only topics related to the gaming mouse.
Because first the latter niche is low competitive as compared to the first one and second it helps your website to establish topical authority in front of Google.
So, in short, it helps you get targeted traffic and sales to your website fast.
2. Find your IKIGAI
Choosing a niche in which you really have a passion to write is really necessary if you want to take your blog to the pro blogger’s level.
Yes, it is really important to choose a low competition niche but if you don’t have an interest in it then even low competition can’t make your blog successful.
So, instead of going for competition all the time go with your IKIGAI.

But what on earth is IKIGAI?
IKIGAI is a Japanese principle that means “A reason of being alive” which you choose only by yourself.
It is at the center between your passion, mission, profession, and vocation.
Didn’t get the idea of how to choose a niche with this principle?
Let’s take an example of my blog niche which is blogging.
I had choose this niche because I was really passionate to talk about blogging through my blog.
Second, my mission for this blog is always to give you quality blogging-related articles which would help you create your profitable blog.
Third, my blog is my profession because I use affiliate links and banners on my website which help me earn some money if you buy something from it.
And I can talk about blogging through my blog till time infinite because it is the work that I always want to do (which is known as vocation)
Many pro bloggers have blogs in various niches so is that mean they have an interest in all of them?
Actually, they don’t have an interest in all of them. They just work on it for some months and after that, they hire content writers for these blogs.
But at the core, they have eternal love for only those blogs which is based on the niche they actually care about.
So I am saying it again that while finding your blog niche go always with your IKIGAI.
3. 777 Method of Niche selection
The 777 method of blog niche selection was introduced by Patt Flynn from Smart Passive income.

It was actually introduced as an exercise to find profitable business ideas but works well to find a perfect niche for your blog as well.
So, what actually is the 777 method?
Let’s test it.
First, take out a pen and a paper and note down:
7 problems you want to solve, 7 passions of your life, 7 fears you want to get rid of.
For example here are seven problems that I want to solve:
Here are 7 passions that I have:
And at last here are my 7 fears:
Phew! It was super tiring but is worthful for finding a perfect blog niche.
After that filter down 10 things that you find the most interesting out of the 21 things that you have noted and from that, you can find the topic that interests you the most.
You can combine some of your passion, fears, and problems into a single topic and can start a blog about it.
3. Find a problem and make a blog on it
Have you gone through a major problem in the past?
Suppose you have encountered the problem of heat rash this summer and to fix that you might have researched a lot about that topic.
You might have used a lot of creams, home remedies, and more to fix this issue.
This means you now know a lot of things about heat rashes so why waste this knowledge if you can make a dedicated blog on heat rashes and make some cash.
Similarly, Bren from brenontheroad.com made a whole dedicated blog on scabies known as scabieshomeremedies.com because at that time he was suffering from that problem.

So, you can too find a problem that you have recently suffered which you have researched a lot and can make a whole blog on that particular topic.
What are the profitable topics to start a blog in 2024?
So, I think you don’t want to find a niche for your blog yourself?
If yes then I have got you covered in this as well.
Here are the 7 most profitable topics to start a blog in 2024:
However, I would still tell you to do your own research to find your blog niche because as I have said that a blog on a trending topic doesn’t guarantee that it would succeed.
So, find your blog niche according to your interest.
Step 2 – Find a good domain name for your blog
After finding a great niche for your blog the next step is to find a good domain name that settles with the vibe of your blog.
There are two types of domain names available on the web:
You can go for any of the two whichever you like more.
Keyword-based domain names were a big thing in the past which could help you outrank your competition and make it to the top of the search engine.
But now search engines focus on other ranking factors like content, user experience, backlinks, and more to rank content.
And now keyword-based domain names have no relevance in rankings.
For example, I searched for “best blogging tools” on Google and as you can see not even a single domain name has the keyword “blogging” or “blogging tools” in it.

Quick tips for choosing a great domain name
Here are some tips which would help you choose a great domain name for your blog:
1. Keep it short dude
Domain name length is a really important factor that most new bloggers ignore.
They would buy a super long domain name which even their regular readers would easily forget which leads to a loss in their direct traffic.
Also, not only me but Google itself says that domain name should be short and within 3 to 4 terms at max.
However, I would recommend you to go for 2 to 3 terms at max in your domain name.

For example, I typed “best SEO course online” on Google, and in the search results, I only found the websites having domain names within 1 to 3 words.

2. No hyphens or numbers
Having hyphens or numbers in your domain name also makes it harder for the user to remember your domain name which leads to a reduction in the recurring traffic.
Also, it has been said by SEO experts that hyphens in domain names look spammy so avoid using that always.
3. Is .com necessary for a successful blog?
Yes, I know this is the most common question in everybody’s mind before buying a domain for your website.
The majority of domain names indeed come with the extension “.com” and people are habitual to this domain extension.
Also, it has been found from a study in 2019 that there are more than 137 million .com domain names are registered across the globe.

And I would surely pick a domain name with .com over 1200 other domain name extensions out there in the market.
But that doesn’t mean that if you start a blog with a domain name extension other than “.com” you won’t be successful.
There are a lot of websites that don’t have .com extension in their domain name still they are super successful like slideshare.net, dynalist.io, and more.
4. Use Domain name generator
Finding it difficult to get the domain name of your dreams?
If yes then do use a business name generator for finding great domain names.
First, go to this website and type in the word which you want in your domain name.
For example, I added “gaming” in the search bar and found these domain names.
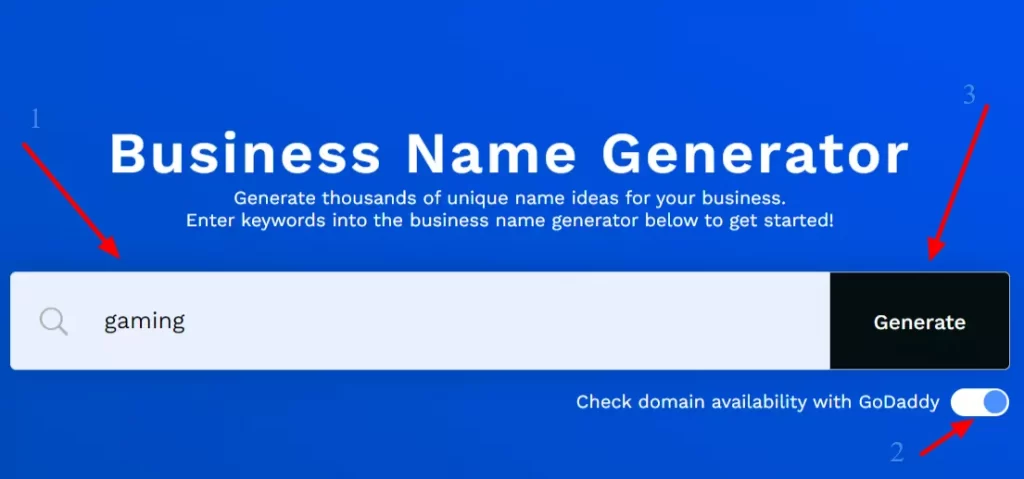
Click on any of the domain names it would show you the availability of this domain name with the major domain extensions like .com, .in, .co, .biz, and more.

So, you can choose the one which you like the most for your blog.
5. Avoid Trademarks
Having a domain name with a trademark is the worst dream for any blogger.
It can terminate your website and all the money that you have invested in it would go wasted.
So for that use Marcaria which can help you easily find if the domain name you have chosen has a trademark registered to it or not.

Also, if you are going to promote any specific product like Semrush then don’t buy a domain name like semrushreview.com.
First, it would be terminated by Semrush and most importantly it won’t be approved for the Semrush affiliate program.
So, you won’t be able to fulfill the vision of your blog.
6. Choose a branded domain name
This is a really important thing to consider while buying a domain name for your blog.
Previously this blog was known as Lightworldwide.com which was far far away from my mission of creating a blog that solves all the blogging queries.
And that was the main reason why I switched to a new domain which you know as Questionblogging.com.
It properly aligns with the brand I want to create with this website.
So, if you want to create a long-term mark in your niche or industry then always choose a domain name that aligns with your vision for that blog.
How to buy a domain name in cheap?
Now if you have hosting and only want a domain name then you can buy it at the cheapest price on Namecheap.
It is one of the oldest and most trusted domain registrars in the whole market.
Here is a step-by-step tutorial to buy a domain name from Namecheap:
Step 1 – First click on this special link to go to Namecheap’s website.
Step 2 – After going there you can add the domain name you have chosen and click on search.
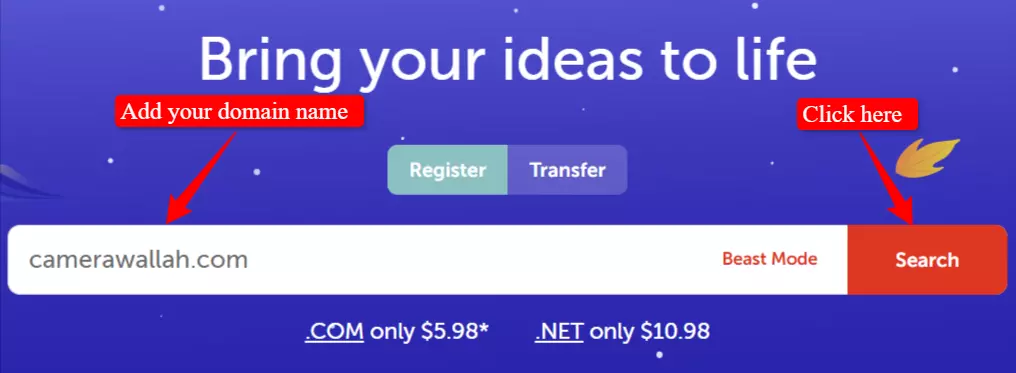
Step 3 – If .com is available then go with it however if not then choose either .in for Indians or any other domain extensions you like.

As you can see the domain is costing $8.98 which equals to 670 rupees for 1 year. Now let’s see how much it is costing on other domain registrars.
Here is the price of this domain of Godaddy which is around 745 rupees for 1 year.

Namecheap is the BEST!
Step 4 – Click on add to cart button to add the domain name to your Namecheap cart. After that click on the “checkout” button present at the bottom of the page.

Step 5 – Remove all the add-ons if you don’t want it to reduce the cost.
Step 6 – Go to the bottom of the page and click on the “confirm order” button. After that make your account on Namecheap if you haven’t made it yet.
Step 7 – At last complete the payment of your domain and after that click on the “continue” button.

And that’s how you can buy the domain for your website at the cheapest price.
However, if you haven’t bought a hosting yet then I don’t recommend you to buy a domain for your website as you would get it for FREE with your hosting.
Step 3 – Choose the right web hosting to host your blog
Buying the right web hosting for your blog is really necessary because it helps in the proper working of your website.
There are more than 3,30,000 web hosts out there in the world.
But out of all those web hosts I personally recommend Hostinger because of its super awesome features and beginner-friendly pricing.

It comes with a lot of great features like LiteSpeed servers, SSD storage, FREE domain, SSL, CDN, Cloudflare protected nameservers, and more.
I personally use it for my blogs and it has been a great journey with this hosting provider.
Things to remember before buying a web hosting
Here are some things which should see in a web hosting provider before investing in it:
1. Pricing shouldn’t make a hole in your pocket
I have seen a lot of hosting providers on the web proving their trash hosting at a price that can surely burn your pocket.
So, before investing in any hosting provider please compare its pricing with other hosting providers as well.
If you are a beginner then I know you won’t have a budget of investing in super-powerful hostings like cloud or VPS hosting.
So, in that case, you should definitely go with Hostinger which offers you cheap and best shared hosting to host your WordPress website.
2. Buy web hosting according to your needs
There is one thing that you should definitely know about this hosting world that you should buy hosting for your website according to your needs.
For example, you can’t buy shared hosting from Hostinger for a website that has traffic in millions.
It would definitely crash your hosting servers and can hamper your business significantly.
For those websites, I would recommend either Hostinger cloud hosting or A2 hosting which can handle this much traffic.
So, always remember that don’t cost cut on your web hosting and also don’t overpay for it too.
3. Do check the renewal pricing
Almost every web hosting provider charges a much an extra bit of renewal charges if you renew your web hosting for the next year.
However, you should definitely check how much your web host is charging you more at the time of renewal.
For example, in my case, Hostinger charged me around $9 more at the time of renewal of my premium shared hosting for the second year.
Which is not that much if you compare to the features and pricing it offers.
4. Features to speed up your website
Now, this thing is a really important factor to consider while choosing hosting for your website.
Remember if your web hosting doesn’t have enough features which can speed up your website then don’t ever go with it.
For example in Hostinger web hosting you get features like Litespeed servers, SSD storage, great storage space in all the plans, and more which can load your website super fast.
Yes, I know that you won’t get the speed of cloud hosting in shared hosting servers but if you are a beginner then you shouldn’t worry about that.
However, if you have a good budget for web hosting then I would highly recommend you to go for Rocket.net hosting.
5. Some FREEBIES!
Freebies are a super important thing that you should definitely seek in a web host especially if you are a cost-cutting blogger who is just getting started.
For example in Hostinger hosting you get a lot of FREE things like Free domain, SSL, CDN, migrations, and more.
How to buy cheap and best hosting from Hostinger?
Here is a step by step tutorial on how to buy hosting from Hostinger:
Step 1 – Click on this special link to visit Hostinger’s website. I would recommend you to go with shared hosting if you are a beginner.
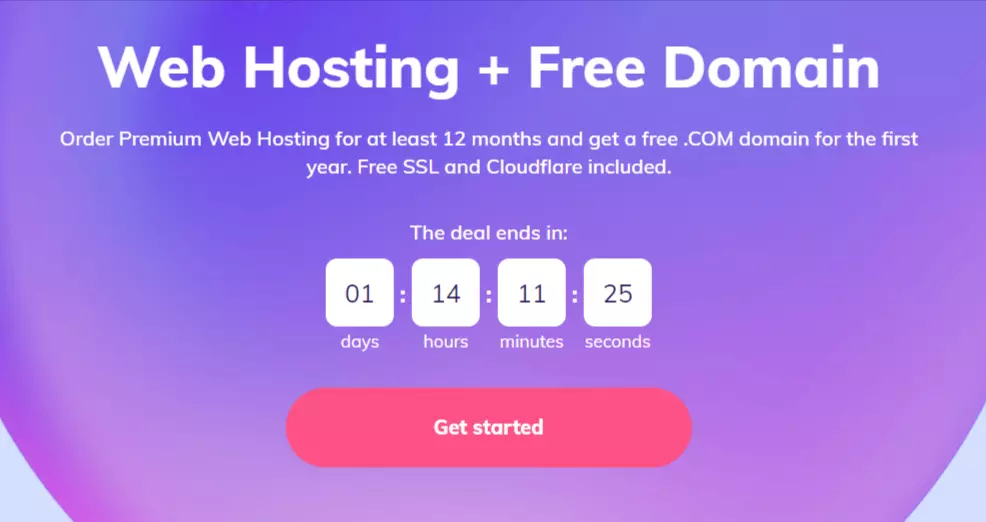
Step 2 – Scroll down and choose the shared web hosting plan you want to get for your website.
I recommend the premium one because it comes with a FREE domain which would save some of your bucks.
After choosing the plan click on the “select” button.

Step 3 – Next choose the period of your web hosting. I would recommend you to go for 48 months plan for maximum discount.
However, if you don’t have enough money for that then at least go with 12 months plan.

Step 4 – After that make your account on Hostinger and then select the payment method you would use to pay for the web hosting.

Hostinger offers a lot of payment methods like:
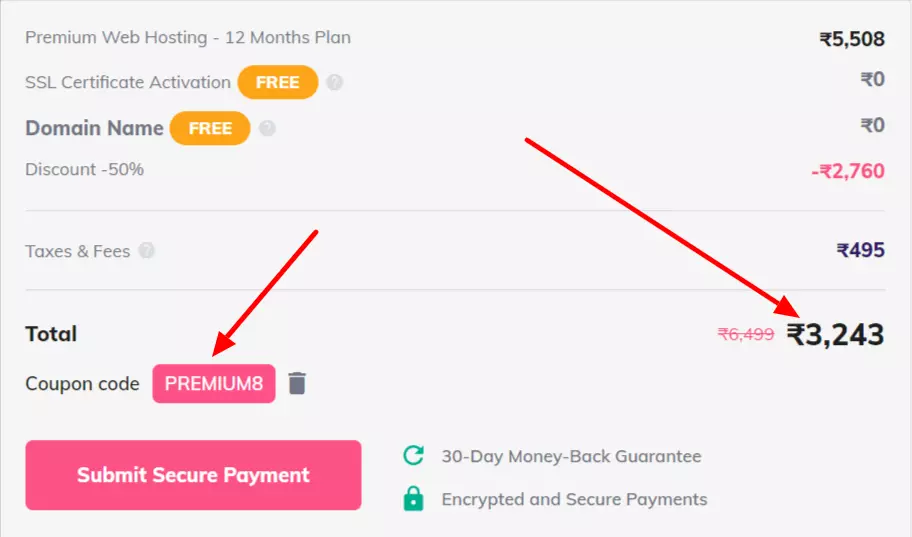
Step 5 – Next click on “Have a coupon code” and add the coupon code “PREMIUM8” to avail extra discount on web hosting.

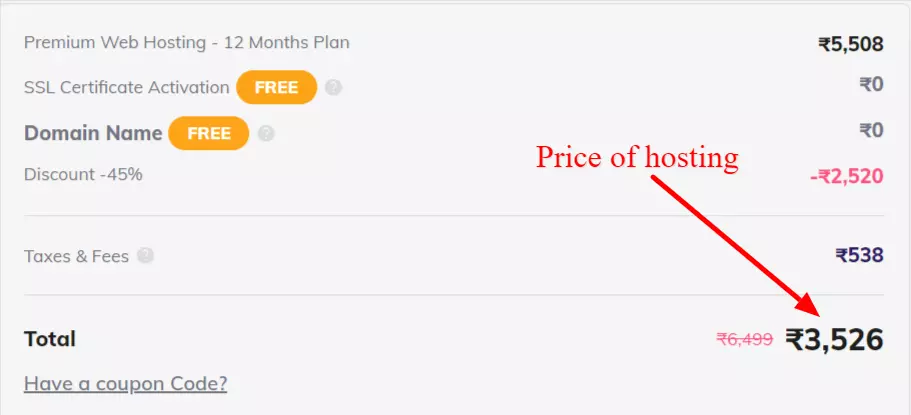
Here is the price of 12 months premium shared web hosting plan without any coupon code.
And here is the price of the same shared web hosting with the coupon code.
Step 6 – At last click on the “Submit secure payment” button and that’s how you can buy Hostinger hosting for yourself.
Step 4 – How to install WordPress on Hostinger hosting?
After buying the hosting your next task should be to install WordPress on your website.
Especially if you are a beginner who doesn’t have any idea of coding still wants to make a stunning website.
Here is a step by step tutorial to install WordPress on your Hostinger hosting:
Step 1 – First go to your Hostinger dashboard and on the top navigation bar click on hosting.

Step 2 – After that go to the website you want to install WordPress on, scroll down and click on the “auto-installer” tab.

Step 3 – Choose WordPress or any other CMS you want to add to your website.

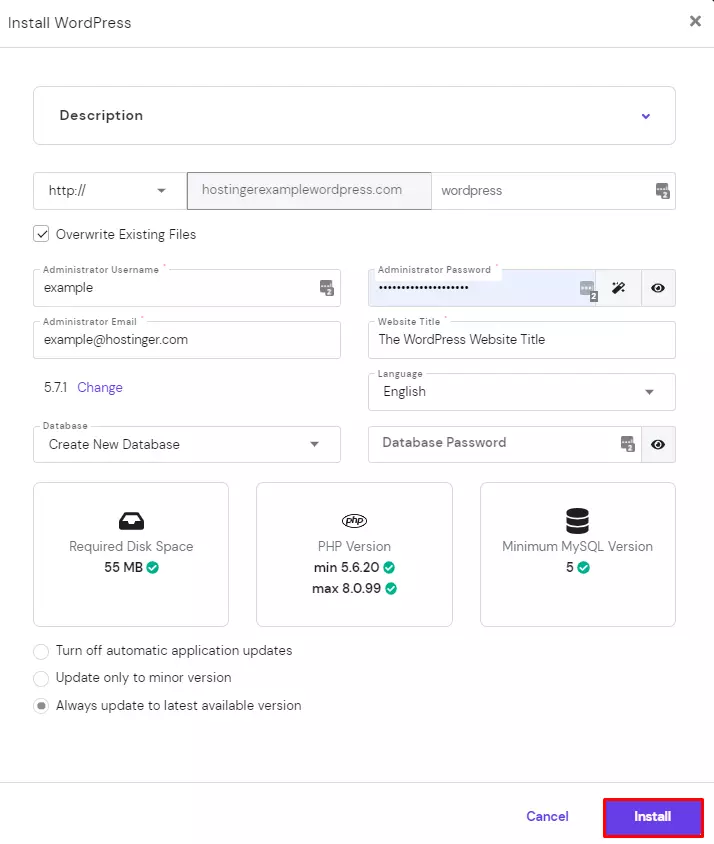
Step 4 – After that fill in the credentials like email, password, username, and more to install WordPress on your website.
Which blogging platform you should choose in 2024?
You might be thinking why I am continuously suggesting you to use WordPress for making your website?

It is because WordPress is my girlfriend and I want to make it famous. Just kidding
Actually, WordPress comes with a lot of amazing features which any other CMS doesn’t provide.
Here are some amazing features that you would get if you use WordPress for making your blog:
1. Helps you easily make your website
If you are a guy like me who don’t want to code down all his website then you should definitely go with WordPress.
So, if you want to make your website without much hassle of coding then you should go with WordPress.
You can literally make your website look super cool and attractive with its built-in themes.
And you can literally add anything ranging from popups to animation into your website easily with the help of WordPress plugins.
All those without any coding involved.
2. Most used CMS around the world
There are more than 64 million websites on the internet that are powered by WordPress which makes it the most used CMS to make websites.
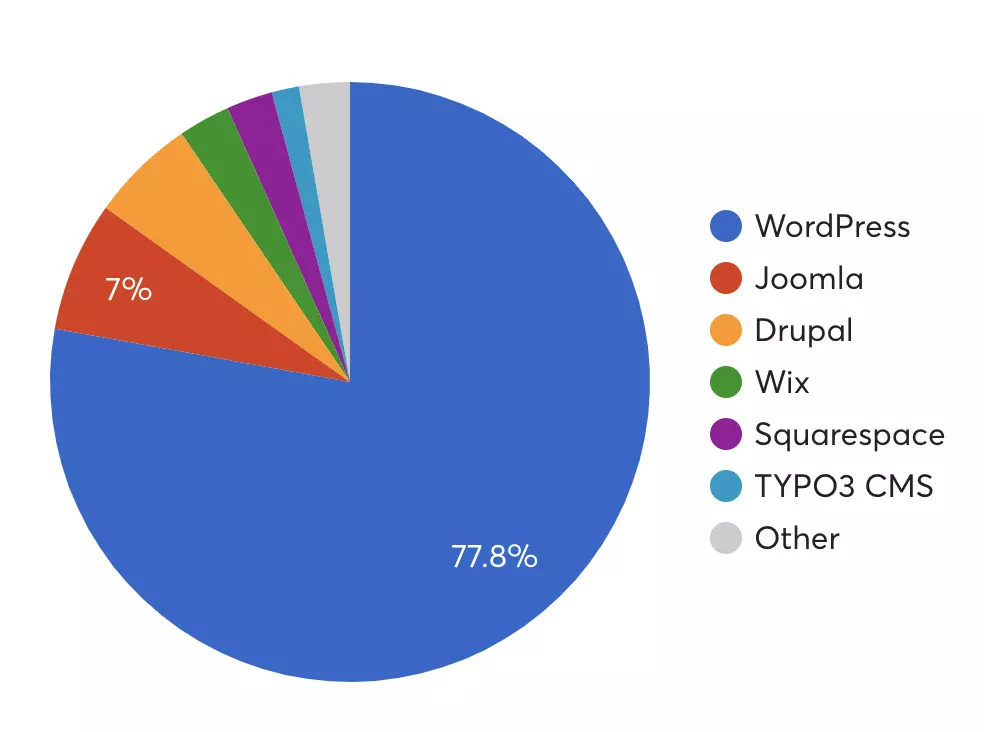
It is all due to its beginner friendliness, speed, security, SEO features, and more.
So, if you want to start a blog on the most popular CMS (Content Management system) of the world then you can do that with Hostinger hosting.
3. WordPress websites are easier to maintain
WordPress websites are way easier to maintain than a custom-coded website especially if your website is old with lots of pages and posts in it.
You have to be a super-skilled web developer if you want to properly manage the huge pile of posts and pages by yourself.
However, with WordPress, you don’t have to worry about it because WordPress would manage it all by itself.
And I am not kidding.
4. WordPress takes speed and security to the next level
Speed and security are the two most crucial things that you should definitely keep an eye on right from the start.
WordPress understands it and that is the reason why they have optimized their CMS for speed and security.
Also, you can easily make your website faster and secure by using plugins on your website like ithemes Security (Free Security plugin) and WP Rocket (Caching plugin)
These two plugins have been a lifesaver to me one has helped my website to load faster and the second has made my website super secure.
5. Search engine friendly code (So you website would rule Google)
WordPress has optimized its platform according to search engines so that its users won’t face any problem in getting traffic from Google.
WordPress works on a search engine friendly code and along with that, you can add SEO plugins like Yoast or Rank Math to make your WordPress website much more SEO-friendly.
Also, there are specific plugins in the WordPress directory for making your SEO tasks easier like redirecting your broken links, speeding up your website, and more.
Step 5 – Important things to do just after buying Hosting
Now after buying hosting and installing WordPress on your domain next you have to do some important things which many newbies don’t do.
And that makes the real difference!
1. Make important pages of your blog
Whether you are going to monetize your blog with Google AdSense or affiliate marketing in both cases you have to make some important pages on your blog.
But why? Because in the case of Google AdSense these pages would help you get its approval on your website fast.
And in the case of affiliate marketing, it protects your website from any copyright infringement and also helps in getting approval from affiliate programs
Here are some important pages that you should add to your website:
2. Move your website from HTTP to HTTPS
Google has announced HTTPS to be a ranking factor in 2014 but it is not as important as other ranking factors like quality content, backlinks, user experience, and more.
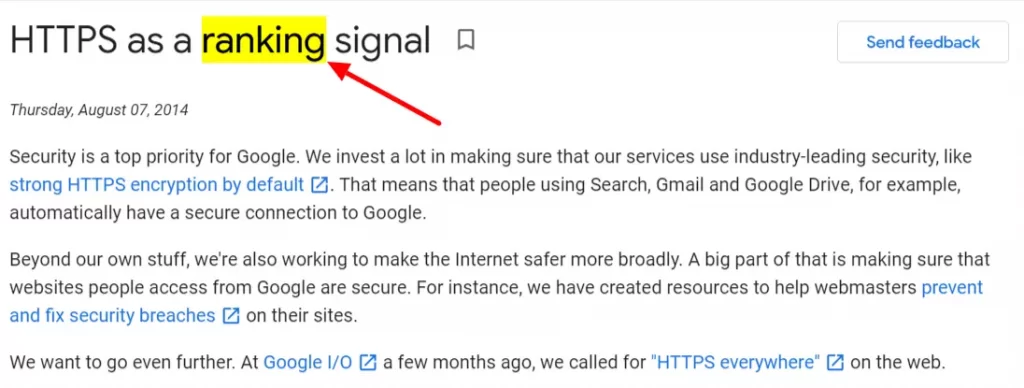
It is a kind of tie-breaker where you might get a higher ranking from a website that has similar quality content as yours if you have an SSL certificate on your website.
But what affects more is this security warning that Google gives to your reader when your website doesn’t have an SSL certificate installed.

It can significantly increase your website bounce rate and decrease the time on site of your website which are super important ranking factors.
So, if you have bought hosting from Hostinger then you would get a FREE SSL in all the plans.
However, if your hosting provider hasn’t provided you with an SSL certificate then you can install Cloudflare SSL on your website.
Here is a video to know how to properly install it.
3. Create the navigation and sidebar menu
The next thing which you have to do after installing WordPress to your website is to make a navigation and sidebar menu.
It increases your website’s navigation, pageviews, reduces your website’s bounce rate, effectively passes the link juice throughout your website, and more.
So, it improves your website ranking on Google so make it for your blog ASAP.
To show a sidebar to your website you first have to enable it on your website.
For that first, you have to go to the Appearance section in your dashboard, and under that click on customize.

Note – This is a tutorial for the Kadence theme if you have any different theme installed on your website then the process might be slightly different for you.
After that, you would be redirected to the customizer page on your website there click on the blog posts tab or achieve tab on the left.
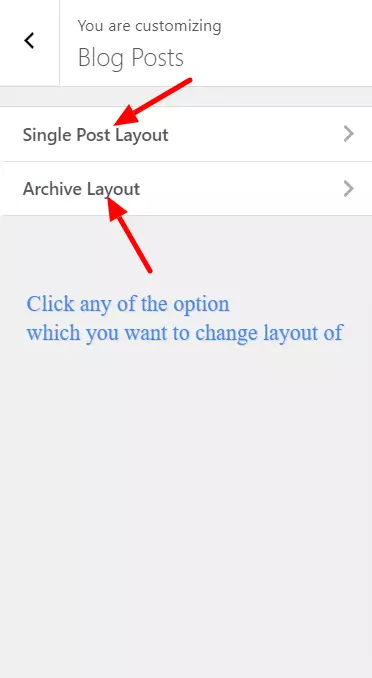
Scroll down and under the default post layout section, you can enable sidebar on your blog posts and choose its position as well.
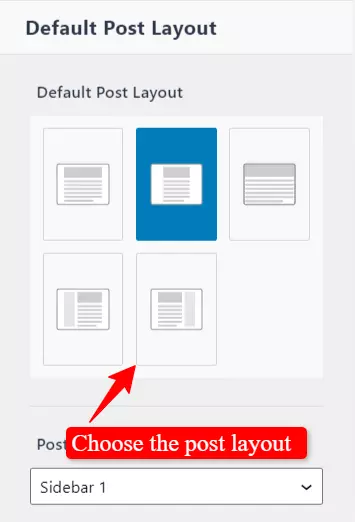
And in the same way, you can enable the sidebar and choose its position on your website pages and search results by clicking on the search results tab and page layout tab.
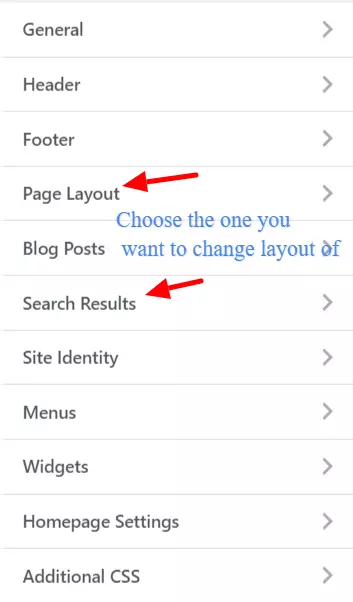
To make a sidebar in your WordPress website you have to first go to the Appearance tab under that go to the Widgets tab and there you can add elements to your website’s sidebar.

You can see this video by wpbeginner to know how to make a navigation menu for your website.
4. Make your website’s footer
Making your website footer menu is really essential for proper flowing of link juice throughout your website, improving your website navigation, and more.

To make the footer of your website first go to your WordPress dashboard and under the appearance tab, you have to go to the widgets section.

There you can add elements to your website footer menu.
4. Create custom e-mail address
This thing is not really necessary to do after you install WordPress on your website.
However, to make a long-lasting impression on your readers you should definitely do it right away.
Yes, many bloggers still use email which is made on Gmail.
But all the pro bloggers like Kulwant Nagi, Anil Agarwal, and more use custom email addresses made with their domain name to make a long-lasting impression on their audience.
Here is a step-by-step tutorial to create a custom email address using Hostinger hosting.
Important things to do in your WordPress dashboard
Here are some important things that you have to do in your WordPress dashboard before starting your blog:
1. Change your site name and tagline
The first thing you have to do in your WordPress dashboard is to change your blog name and tagline.
For that go to settings under that go to general tab and there you can change your site name and tagline.

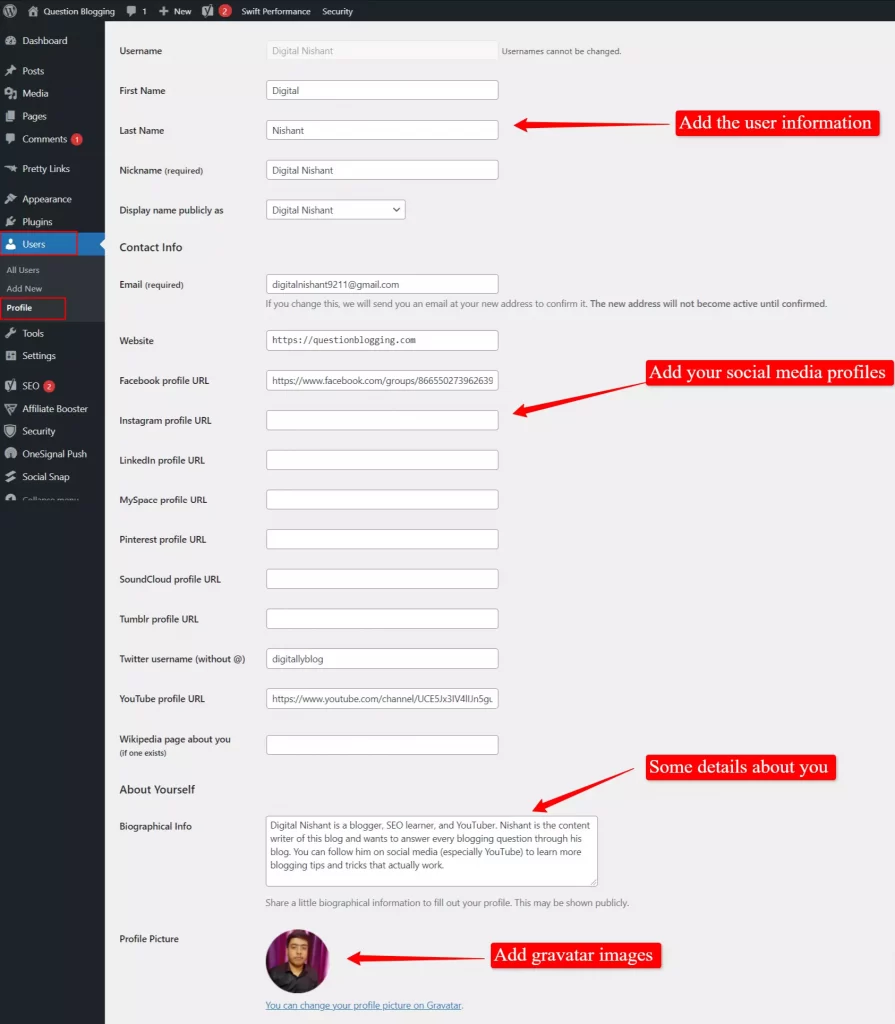
2. Fill all your user information
Next to that, you have to add your user information to your WordPress dashboard.
For that go to the profile tab in the users section, choose the user, and add your info there.
3. Setup your homepage and blog feed
Next, you have to configure your homepage and blog feed.
For that, you have to go to the settings tab under that click on reading.

If you want your homepage to display blog posts then choose this setting and if you want a custom-made homepage then choose this setting.
4. Change the permalink structure
Permalink is really important for SEO and you have to choose the right one especially when you are using WordPress.
WordPress gives you a lot of permalink types that you can choose from according to your liking.
Here is the permalink structure that I personally like the most and use on my blog.

5. Upload favicon and your logo
Adding a favicon and logo to your blog is really important if you want to make it more brandable and long-lasting.

You can use Canva to make a favicon and logo for your blog absolutely FREE!
6. Remove unnecessary plugins, themes and demo content
Native WordPress comes with a lot of demo plugins, themes, posts, and pages in it.
These are basically trash which you should definitely remove as soon as you enter into your WordPress dashboard for the first time.
Step 6 – Choose the perfect theme for your blog

Choosing a great theme for your WordPress blog is really necessary.
First, your website theme influences many other factors like website speed, design, and a lot more.
So, I would recommend you to choose your WordPress theme by keeping a lot of factors in your mind.
Here are some factors you should keep in mind while choosing a WordPress theme for your blog:
I personally use and recommend the Kadence theme as it fulfills all the conditions of being a great WordPress theme. (Read my Kadence Theme Review)

Before this theme, I have tested a lot of themes on my blogs and almost all of them lacked some important features.
But after finding Kadence I never looked back at any other WordPress theme for my blogs.
And the best thing about this theme is that it comes with a good amount of features even in its free version.
So, if you are a beginner then you can go with the free one and if you are satisfied with it then you can go with the premium version which unlocks the true hidden potential of this theme.

Also, the premium version of this theme comes with a beginner-friendly price which just costs you $59 for unlimited websites for 1 year.
Tips to design your theme like a pro
Here are some of my personal tips which would help you design your theme beautifully (without being an expert web designer):
1. Leave a lot of white space
Leaving a lot of white space in your blog post makes it easier to read for your readers.
Along with that, it enhances the look of your blog post and it much more attractive.
See this image tell me which of the two paragraphs you find more interesting to read.

I would go with the one which has more white space in between lines.
So, in short, if you want to make your blog post look more attractive and readable then add white space to it.

But don’t go overboard doing that.
2. Use coding to design your theme
If you want to design a WordPress theme then there is nothing better than coding for it.
Yes, it can be really tiring to do all the designing of your theme by writing the code all day but it can save some of your bucks from buying page builders.
To change the code of your WordPress theme you have to go to the theme editor tab under the appearance section.
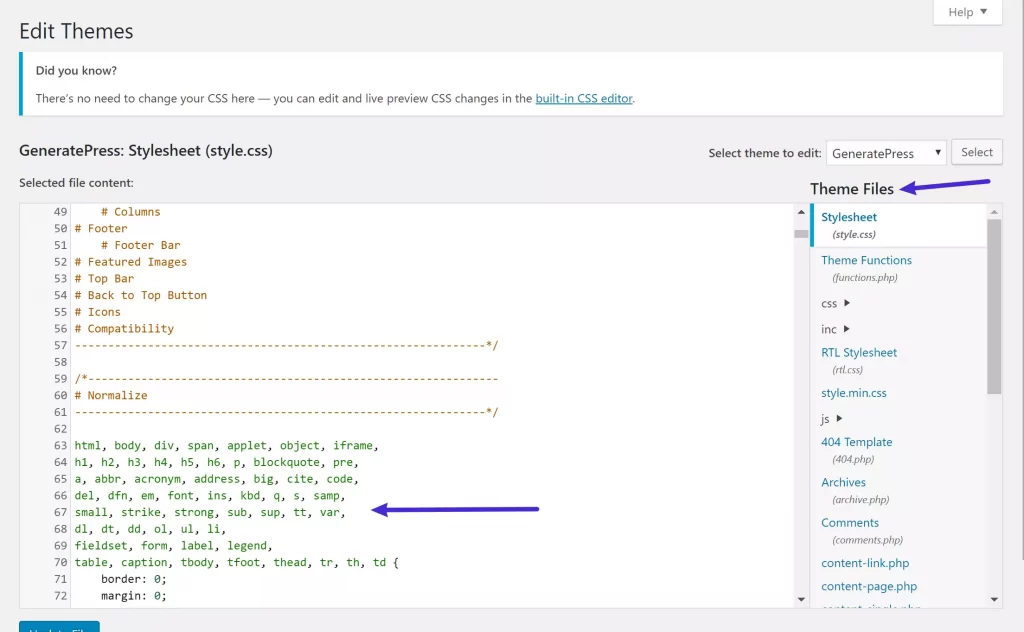
And there you can add your code to any of the theme’s PHP files.
3. No code website designing (Use page builders)
Yes, coding is a cost-cutting way of designing your WordPress website but I would still recommend you to go with the no-code way.
Why? Because in blogging you have to focus on a lot of things which takes time.
And if you waste the majority of your time designing your theme then it can really hamper your other blogging tasks which are more important.
So, to save your time you can use page builders like Thrive Architect, Elementor, and more which would help you make a beautiful-looking website easily.
You can go with visual page builders like Elementor, Thrive Architect, and more to design your website.
And if you are concerned about page speed then you can use block page builders like Kadence blocks, Generateblocks, and more.
I personally use Kadence blocks to design my blog posts and homepage.
Look how beautiful it is????.
4. Remove distractions as much as you can
I have seen many newbie bloggers using a lot of elements on their websites like mega headers, big bulky sidebars, and more.
They think that it would increase their website’s sales and pageviews.
But instead, it distracts the readers and leads to a high bounce rate of their website.
So, I would suggest you keep the distractions to the minimum, especially if you are doing affiliate marketing through your website.
Along with that, you can use a heatmap generator to see where your readers are clicking while visiting your website.

And if they are not clicking on the sidebar or mega menu of your website then there is no point in keeping it.
5. Try the site templates
Many WordPress themes come with pre-designed site templates which you can use on your website if you don’t want to design your theme from scratch.
Kadence theme gives you a lot of starter templates to add to your website even if you are using its FREE version.
For that first, you have to go to the plugins section, where you have to install the Kadence starter templates plugin and activate it on your website.

After installing that you can choose the starter template which you want to add to your website.

However, I would recommend you to design your theme from scratch. Yes, it would take time but it would be super worthful.
6. Change font color and typography

Font color and typography of your blog are the two things to which bloggers don’t pay much attention.
However, in terms of readability and design, they are super important.
If you choose the wrong font color and other typography settings of your website then it can cost you a lot in long run.
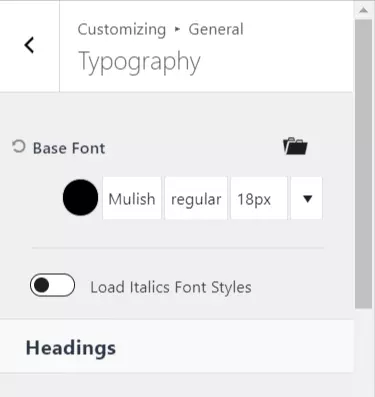
In the Kadence theme, you can easily change the typography settings of your website just by going to the typography tab under the general settings in your WordPress customizer.
I personally use Muli font 18px on my website.
7. Design a custom homepage
This is a mistake that I have done when I was new to this blogging industry that I was not making a custom homepage for my websites.
I relied on the homepage which features only the blogs of my website which is good if you are making an AdSense blog but if you want to make a branded blog then the homepage is the thing you have to design yourself.
And that is the reason why I want you to design your website’s homepage yourself.
Here are the things which you should definitely add to your homepage:
Step 7 – Install essential plugins on your WordPress blog
Plugins are those weapons of WordPress that have helped them to stay ahead of their competitors till now.
You can literally add anything to your website with these plugins. No coding is needed.
1. WP Rocket
WP Rocket is a killer caching plugin. No one can argue on that!
This is my favorite caching plugin which I personally use on my websites to make it load faster.
As you might know, that website speed is super important as 1 second delay in your website speed can reduce your website page views by 11%.
So that is the reason why I have invested in this premium cache plugin for my website.
However, the features that it comes with fully justify its pricing and that is the reason why more than 19 lakh webmasters are using it on their websites.

Here are some major features of this plugin:
You can read my WP Rocket review to know in-depth about this caching plugin.
2. iThemes Security

Security of your website is a very important thing which I have recently realized.
Do you know that more than 30,000 websites are hacked every day?
I have installed the iThemes security plugin on my website recently and found that someone was constantly trying to log into my website’s dashboard.
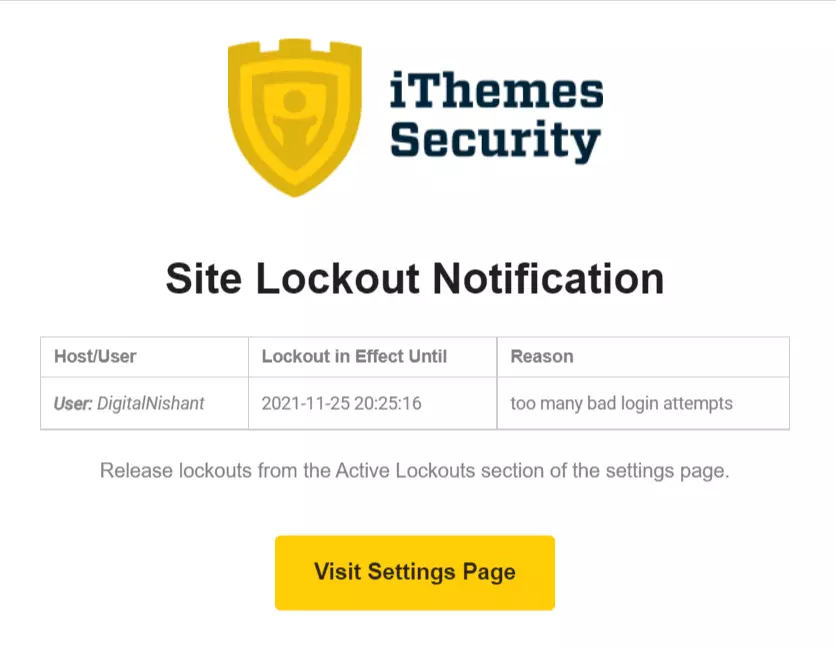
I am personally using the free version on my website which is enough if you are just starting out.
It would secure your website from start to end so your website won’t get hacked.
You can see this tutorial to know how to configure this plugin on your WordPress website.
3. Akismet Anti Spam

Comment spam is real! Bloggers get a lot of spammy comments on their websites which can make their website spammy.
So, to remove that you should definitely use Akismet Anti Spam plugin on your website which would filter your blog comments and make a significant decrease in spammy comments.
Also, these spammy comments would be put in a separate folder of spam which would be automatically removed after some time.
You can easily remove spam from your blog comments by using the free personal version of the Akismet Anti Spam plugin.
You can see this video to know how to use this plugin on your website for FREE!
4. GA Google Analytics
Google Analytics is a robust tool to track your website performance by measuring its bounce rate, page views, page on-site, and a lot more.
You can easily connect your WordPress website with Google Analytics with GA Google Analytics plugin for FREE!
I will tell you how to configure this plugin in a bit. So stay tuned!
5. Kadence Blocks or Elementor
A beautiful-looking website is very important and the best way to do that without any coding is by using a page builder for designing your website.
You can use Elementor for designing your website from start to end.

The best part?
You can do it visually which means that you can see how your website would actually look like while designing your website.
So, your designing process would be more streamlined and faster.
I would recommend you the premium version of this page builder as the free version is very limited.
However, if you don’t want to hamper your website speed with visual page builders like Elementor then you can use block-based page builders as well.
I personally use Kadence blocks to design my website which is a great block-based page builder.

It comes with a lot of different blocks that you can use to design your website’s homepage and blog posts.
You can go for it free version if you are starting out but if you want to design your website to the next level then go for the premium version.
6. Social Snap

Social snap is the best social media sharing plugin that I have ever used on my blog.
It is lightweight, comes with beautiful social sharing buttons, close to accurate social shares, and more.
You can start with the free version if you are just starting out and as you eventually grow then you can go with the premium version.
Here are some features of the social snap plugin:
7. Redirection

Broken links are poison to your website’s SEO.
However, you can easily fix it by using the free WordPress plugin Redirection.
You just have to put the source URL, target URL, click on add redirect button and the URL is 301 redirected.
The best thing?
It would automatically add a 301 redirect every time you change the URL of your blog posts.
You can see this video to know how to properly configure this plugin.
8. Optinmonster

People hate popups and it has been there for a long time.
However, all popups are not bad. Actually, exit-intent popups really do good because it helps you reduce your website’s bounce rate, capture email, and more.
You can easily make beautiful exit-intent popups for your website with the help of the Optinmonster plugin.
However, this plugin is premium but comes at very affordable pricing starting from only $9 per month.
9. Yoast SEO or Rank Math
An SEO plugin is a great starting point for beginners to learn how to optimize their blog posts for SEO.
I personally use and recommend Yoast SEO for your WordPress blog.

However, Rank math is more feature-packed than Yoast SEO in both free and paid versions.

So, if you have a new website then start with Rank math but if you have started your website and using Yoast SEO then don’t change it.
As changing it can affect your website’s traffic negatively which I have personally experienced.
10. Shortpixel
WebP images are the future format for images on the web. It can significantly reduce your website’s images size so your website would load faster.
You can either convert all your website’s images manually or you can use a plugin like Shortpixel to convert your website images to WebP format.
The second one is easier and you can use plugins like ShortPixel for that purpose.
It gives you 100 image credits every month for FREE by which you can optimize 100 of your website images.
It is enough if you are just starting out in this blogging world.
Note – Sorry for disturbing you! Bookmark this page if you don’t want to read this huge guide in one shot!
How to add plugin to your WordPress website?
Here is a short and sweet tutorial on how to add plugins to your WordPress website:
Step 1 – Go to your WordPress dashboard and on the left sidebar click on Plugins.

Step 2 – Next click on add new button on the top.

After that, you have two options first to upload the zip file of the plugin manually or search the plugin and install it on your website.
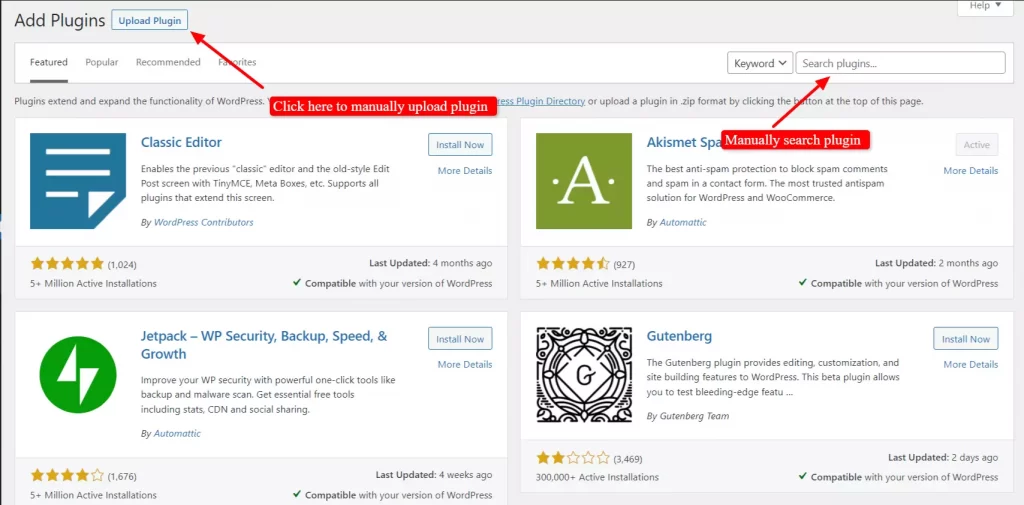
Step 3 – Search your plugin name here, after finding it you can click here to install it on your website.

Step 4 – After that just click on this activate button to activate the plugin on your website.

However, if you want to manually add a plugin then at the plugins page just click here and upload your plugin zip file here.
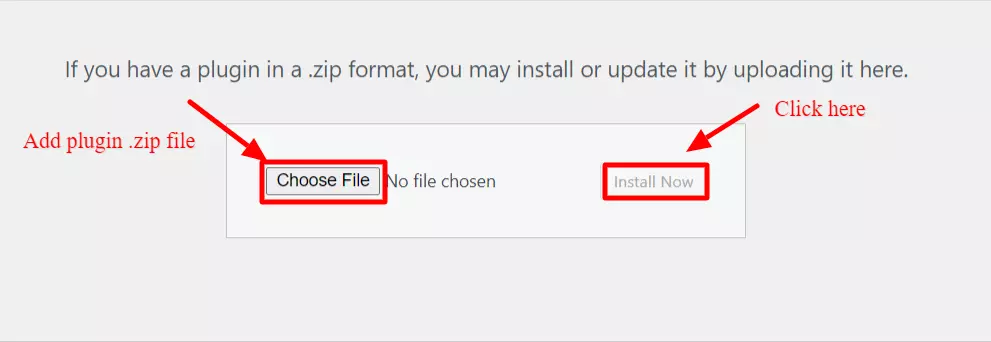
After that just click on activate to activate this plugin on your website.
Step 8 – Submit your blog to Google search console
Google search console is a great tool by Google which helps you submit your site to Google and know about its organic presence.
It gives you a lot of tools to analyze technical problems, submit your website sitemap, helps Google discover your website faster, and a lot more.
The best thing?
It is totally free so you can use it to find and fix the problems on your website without giving a penny.
So, you should definitely add your website to this tool so Google won’t take ages to recognize your website.
Here is a tutorial on how you can do that:
Step 1 – First click on this link to go to the Google search console website.
Step 2 – After going there you would see two methods to verify your website on the Google search console. I recommend the first one.
Step 3 – Next enter your website URL and click on the continue button.
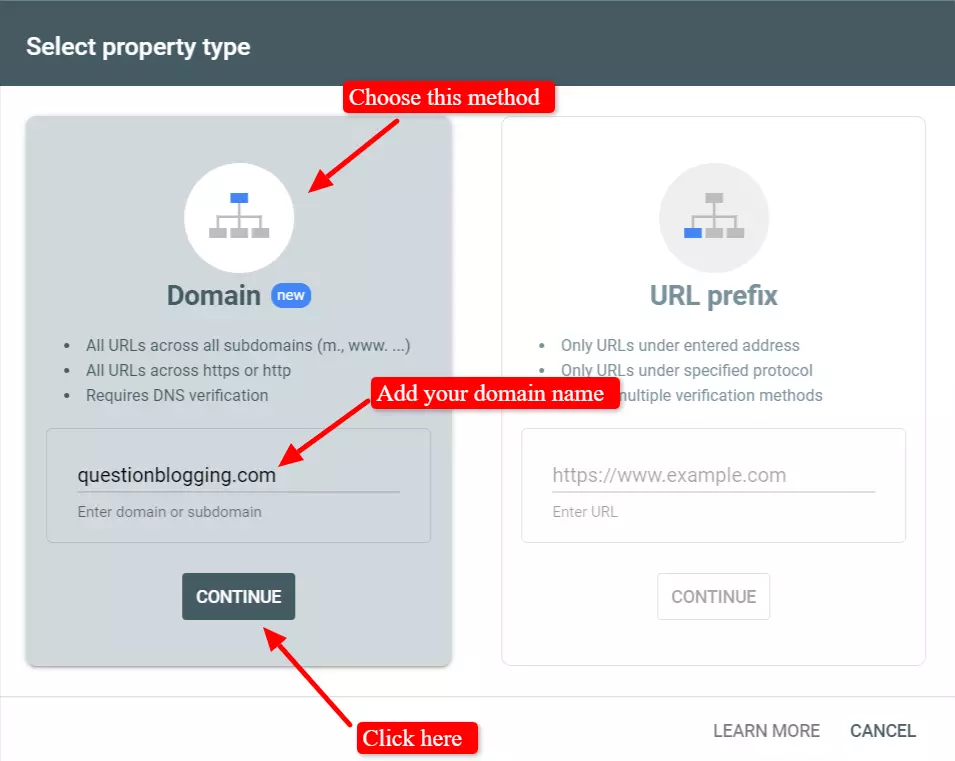
Step 4 – After that, you have to verify your website by adding this text to the TXT record in your website DNS.
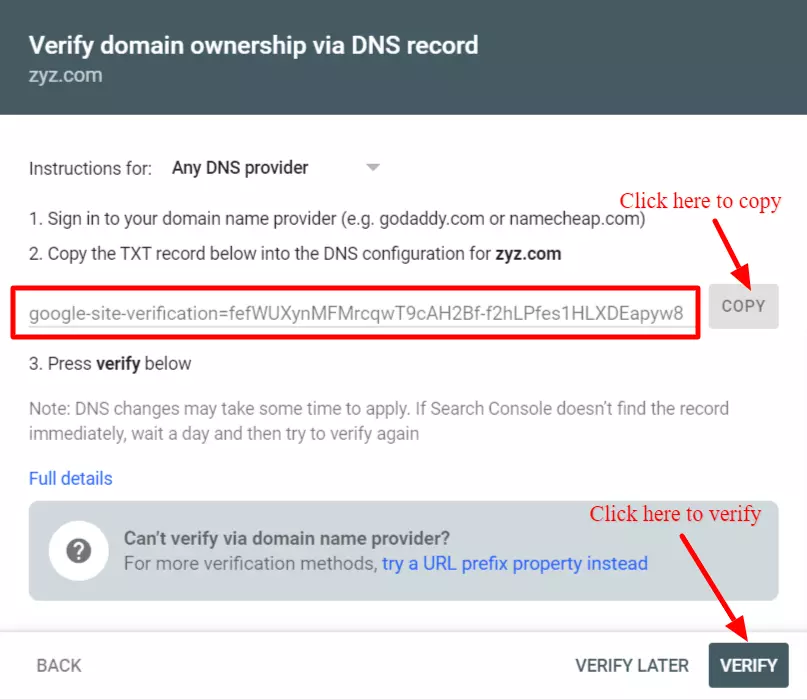
Step 5 – Copy the TXT code by clicking on the copy button here. After that go to your Cloudflare dashboard, choose the website you want to verify, and on the left sidebar click on DNS.

Scroll down, at the last record you would get the TXT record of that domain, click on edit and add the code you copied here.

After that clear the cache if you are using WP Rocket or any other caching plugin so the Google search console can easily detect the code.
You can see this video to know how to add your website to Cloudflare????.
Step 6 – After that again go to Google search console and click on the verify button.
It might be possible that Google may not recognize your website even after adding the code to your website TXT record.
So, in that case, wait for 5 to 10 minutes and then try to verify again it would surely work.
Step 9 – Add Google Analytics to your WordPress website
Google Analytics is another awesome tool by Google which helps you analyze your website performance without giving a single dime.
It is one of the most favorite tools of webmasters around the world as it comes with metrics you won’t even get in the premium tools.
You can see your website speed, bounce rate, page views, time on site, and much more which helps you improve your website.
Here is a step by step tutorial on how to add Google analytics to your WordPress website:
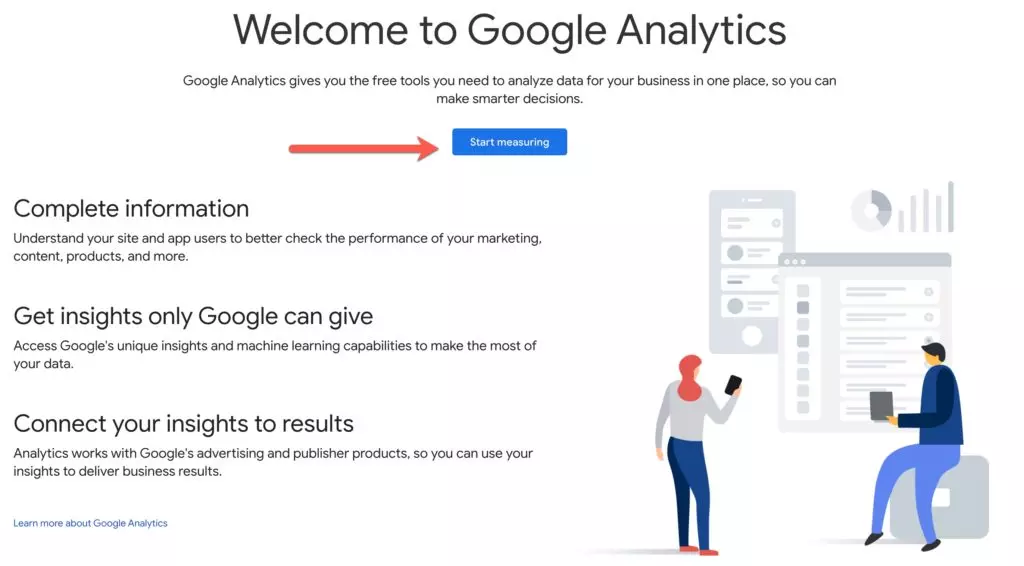
Step 1 – Click here to go to the Google analytics website and after going there just click on the start measuring button.
Step 2 – Next add your account name, tick all the boxes given there, and click on the next button.

Step 3 – After that, you have to enter your Google analytics property name, add the time zone and currency.

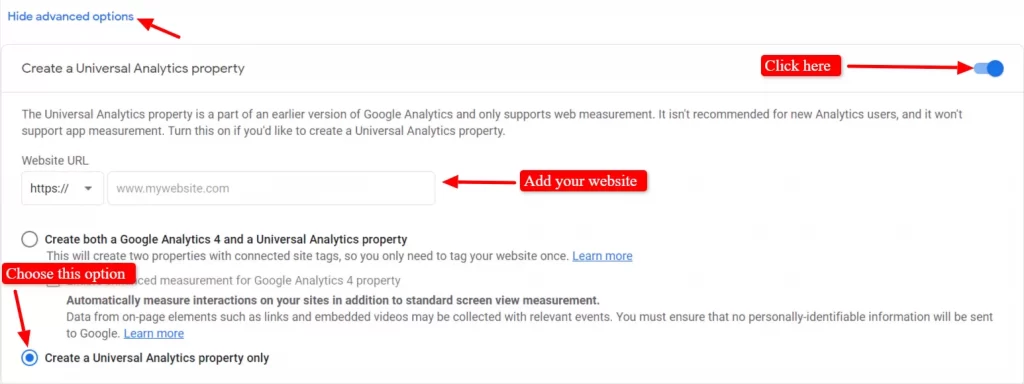
Next click on show advanced options, under that switch on the universal analytics property, choose the create universal property option (I recommend), and click on the next button.
Step 4 – Choose your industry category, business size, your use of Google Analytics, and after that click again on the save button.

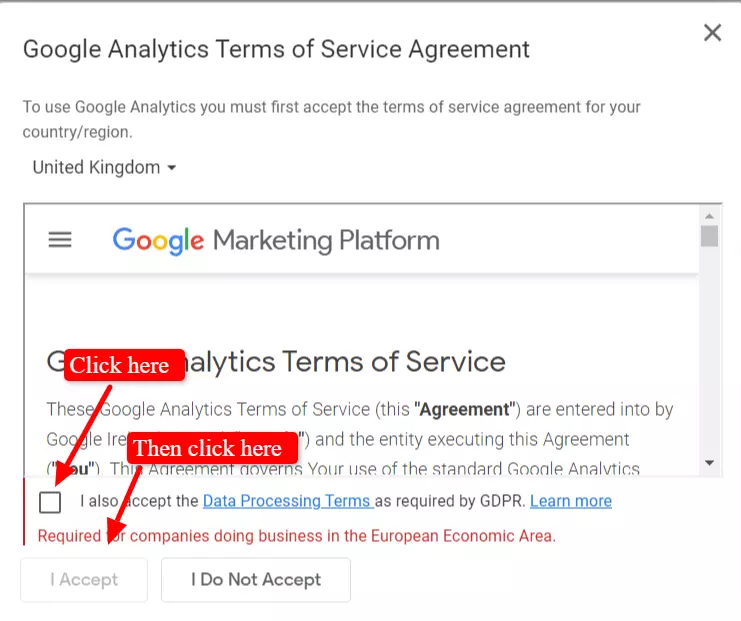
After that accept all the terms and conditions of Google Analytics and click on the I accept tab.
Step 5 – To start tracking your website performance you just have to put this code in your website header section.

Or alternatively, you can use the GA Google Analytics plugin that I have talked about previously in this article.
Step 6 – First install and activate this plugin on your website. After that under the settings tab click on Google analytics.

Step 7 – Next you have to put in your Google Analytics tracking code here.

To find that first go to your Google Analytics dashboard and click here. After that click on the tracking code under the tracking info section and here is your tracking code.

Just copy and paste it there
Step 8 – Here are all the settings that you have to do in this plugin.

Step 9 – After that again go to the tracking code tab in your Google analytics setting and click on send test traffic button.
It would send test traffic to your website and if analytics would detect it then it means that the analytics code is properly implemented on your website.

And that’s how you can add Google analytics to your WordPress website.
Step 10 – How to do keyword research for your blog?(Beginner friendly way)
Keyword research is a very crucial thing that you have to do before starting your blog writing process.
It has a lot of benefits for example it helps you find the intent of the keyword, find if the keyword has search volume or not, and a lot more.
So, for that always do keyword research for finding great blog topics.
Here are two methods by which you can find low hanging keywords for your blog:
1. Keyword Research with Semrush
Semrush is my favorite tool for SEOs and bloggers out there. No other SEO tool can even match the standards of this tool.
I have used Google Trends to compare the popularity of this tool with its primary rival Ahrefs.

You can see that Semrush has a complete lead over Ahrefs as it is not only an SEO or keyword research tool but a bunch of tools for your online journey.
You can read my Semrush review from here to know more about Semrush.
But how can you use this tool for keyword research?
Here is the step-by-step tutorial for finding keywords with Semrush:
First, click on this exclusive link to get the free 7 days trial of the Semrush Guru plan.

For that, you just have to give your credit or debit card details and you would avail this trial.
Don’t worry you can easily cancel your trial anytime without giving a single penny to Semrush.
After that, you have to go to the keyword magic tool from here.
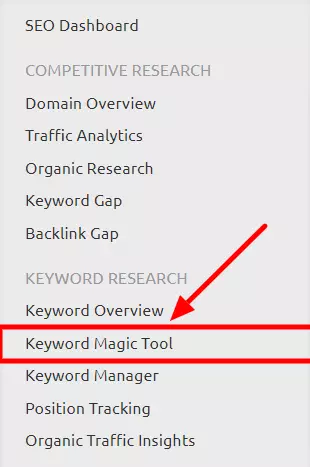
After that, you have to enter the seed keyword you want to target, choose the country you are targeting and click on search for example “blogging for beginners”.

On the next page, you would get a lot of keywords that you can blog on.
Also, you can easily get question keywords for your blog with Semrush.
Along with that, there are a lot of other options and filters that you can use to find profitable keywords.
You can easily see the search volume, CPC, difficulty, and more of the keywords.

Also, you can see the intent of the keywords there so you won’t have to manually check it by seeing the SERPs on Google.

It would save your time and is great for beginners who don’t know much about keyword intent and all.
Along with that, you can easily find keywords from your competitors too.
For that, you just have to go to the organic research section from here.

After that just add your domain here, choose the country and click on search.
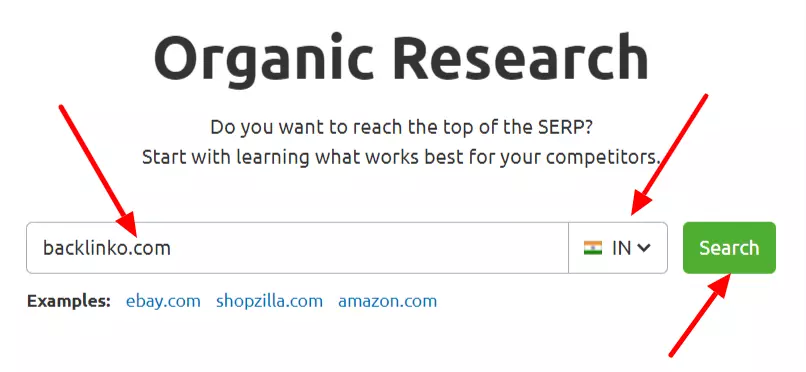
Scroll down and click here to reveal all the keywords that your competitor is ranking for.

Choose the keywords that you find lucrative and write blog posts on them.

2. Keyword Research with Google
The second method is for beginners who don’t have much money to spend on a keyword research tool like Semrush.
To find keywords using this method first go to Google and type in your seed keyword for example “keto diet”.
Don’t press enter Google would give you the long tail variants of your seed keywords.
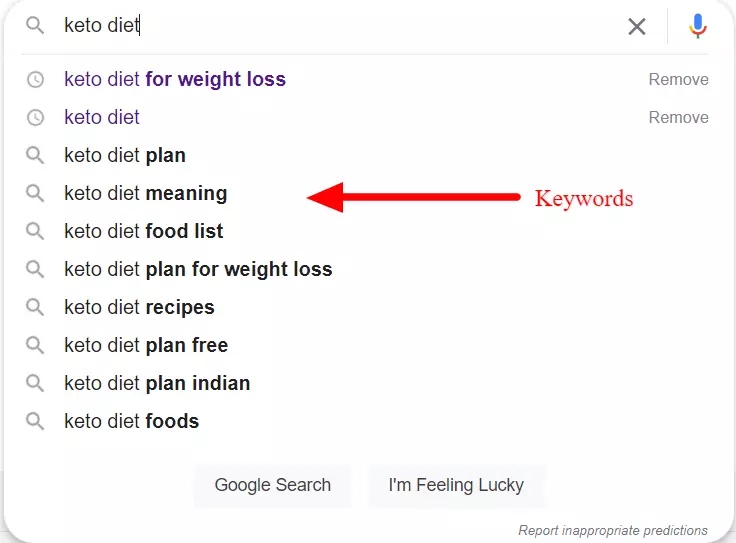
Next, you can go to any of the keywords given by Google and press enter it would give you more long-tail variants of that keyword.

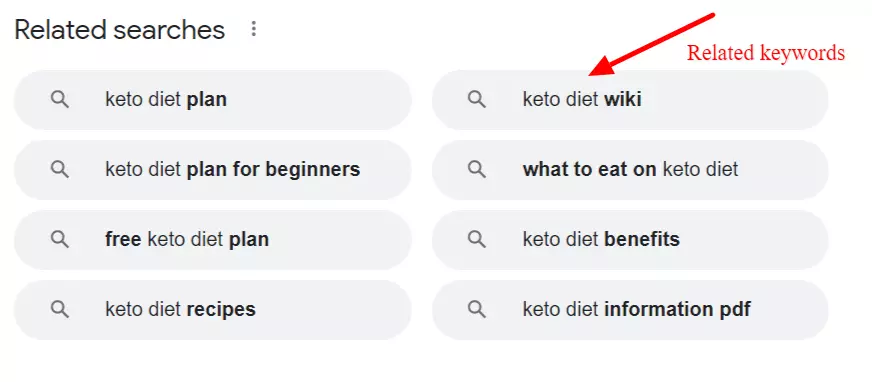
After that click enter and on the SERP page scroll down it would give you more related keywords that you can use in your blog posts.
However, there is a problem with this method that you can’t find the search volume, CPC, and other keyword metrics without using any SEO tool.
So to fix that, first, you can find keyword ideas with this method then take the 7-day free Semrush Guru plan trial where you put these keywords one by one and find out its difficulty, CPC, search volume, etc.
Step 11 – Write a killer blog post and publish it
After doing all these things on your WordPress website now is the time to write a killer blog post for your blog.
Here are some personal tips and tricks that I use to write in-depth blog posts for my blog:
1. Write in ‘You’ and ‘I’
If you want to really make your blog post engaging then the most basic yet effective tip is to write it in a conversational manner (with you and I).
I personally use this tactic right from the start of my blogging career and it makes my blog much more engaging.

Also, not only me but many pro bloggers like Kulwant Nagi, Ankit Singla, and more write their blog posts in this tone.
And that’s why their readers love to consume their content.
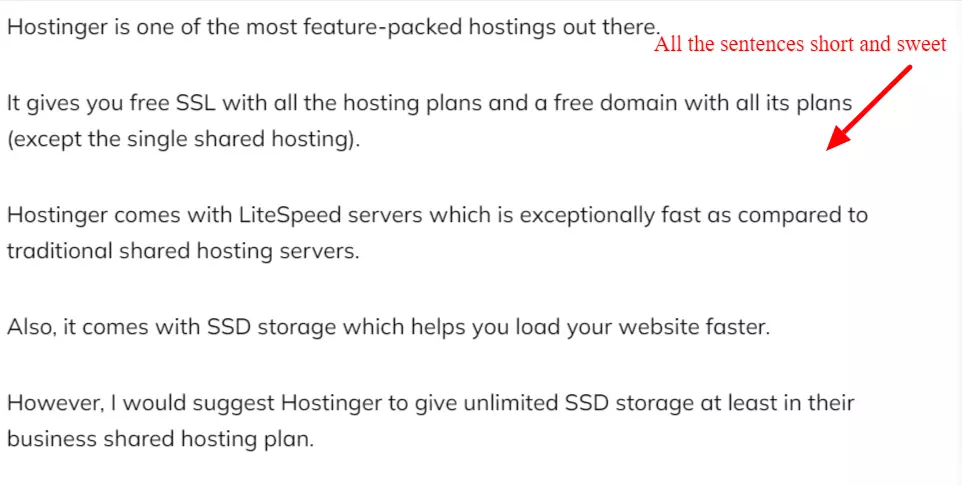
2. Sentences 20 words or less
Here are two paragraphs tell me which one would you would enjoy reading?
I would go with the shorter paragraph one because it is much easier to consume.
So, if you want to craft an awesome blog post that your readers would stick to then go with paragraphs that contain 2 to 3 lines at max which would contain around 20 words.
It would make your blog post much easier to skim.
Note – I have recently started using Jasper for my blog content creation process. You can try it for absolutely free using its free trial.
3. Use blocks to amplify your blog post looks
Have you read my Chemicloud vs Hostinger review or my Hostinger Black Friday deals page?
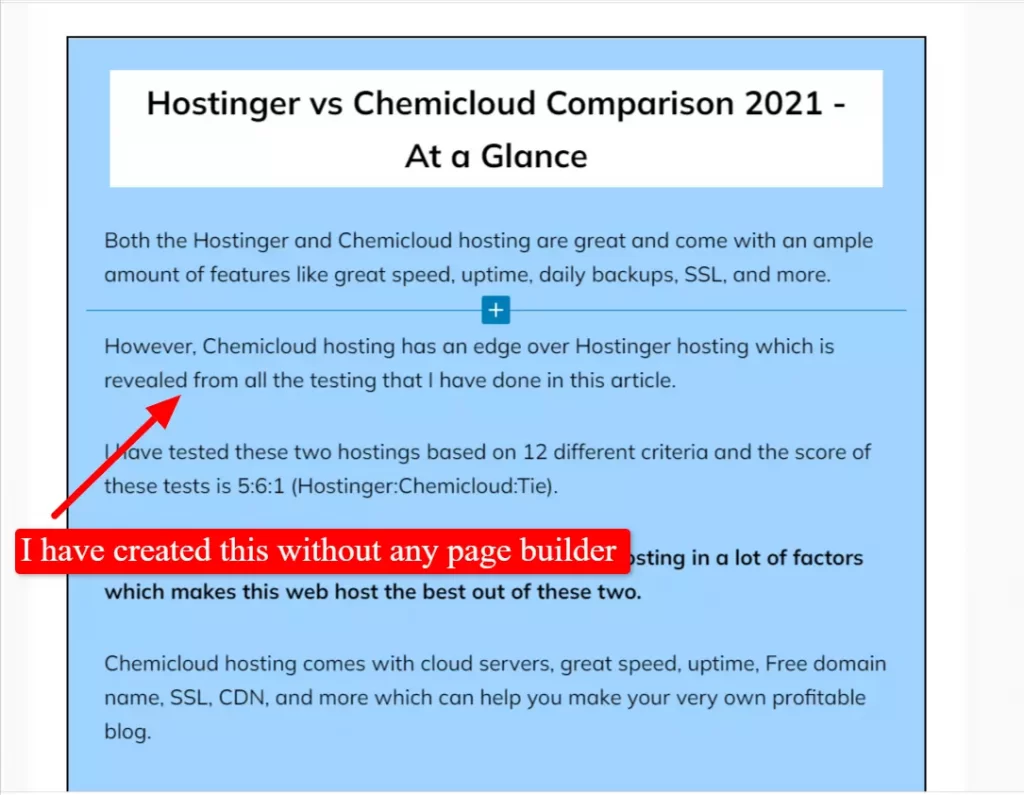
If yes then you might have noticed that in these articles I have added some boxes and other designed elements to enhance my blog post’s aesthetics.
It actually gives a reason to you to stay on my blog post for a longer time.
But how I have created these elements without using any bulky page builders like Elementor?
By using Kadence blocks. Yes, you heard it right!
So, if you want to add these elements to your blog post without compromising your website speed then you should definitely use Kadence blocks.
4. Answer the query ASAP
This is a super exclusive tip from Ankit Singla sir from masterblogging.com.
Which he has revealed to me in my Facebook group (Join now!????).

But why it is important?
As I have previously mentioned that online readers have a very less reading span.
So, you would have to admit that some readers of your blog would bounce back without reading your article fully.
For that reason, you should definitely answer the query of your blog post right at the start in a brief manner.
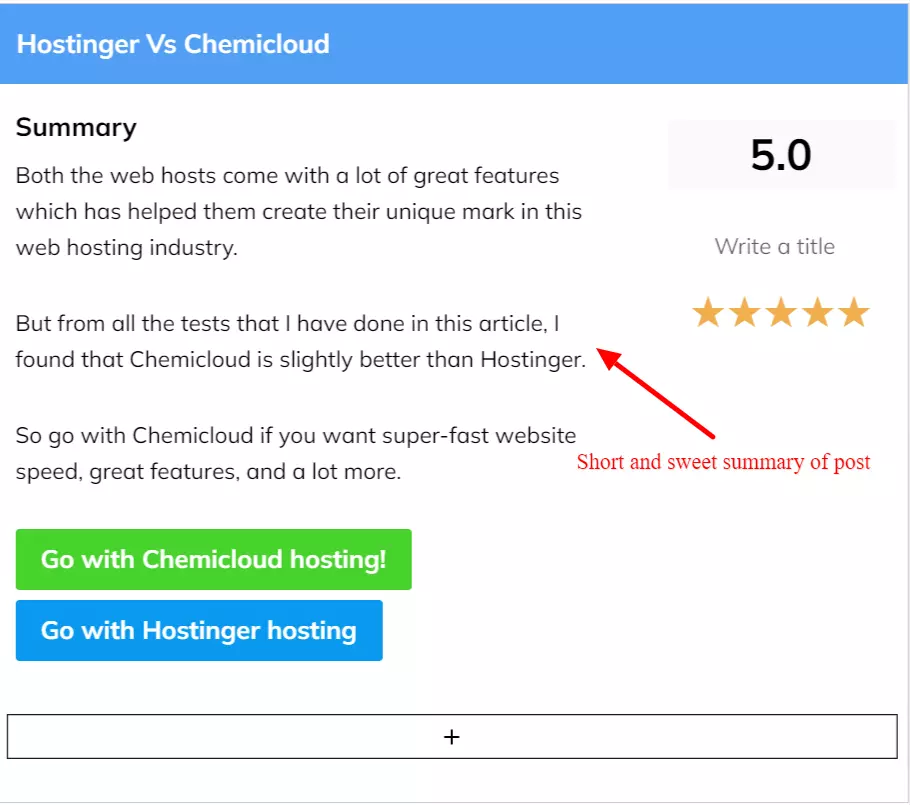
It would help your readers to stay on your blog post and it can increase your affiliate sales if you are going to use this tactic in your affiliate articles.
5. Follow SEO plugin guidelines
If you are a beginner who has no damn idea of SEO then I would highly recommend you to follow the guidelines given by your SEO plugin while writing your blog posts.
It would make the process of learning on-page SEO easier for you.
You would get the on-page SEO checklist just after your blog post in the Gutenberg editor.
I would highly recommend you to use Rank math as it comes with a more detailed checklist to optimize your blog post than Yoast.
However, I must tell you that all the SEO plugins still show keyword density as an On-page SEO metric in their checklist.
But actually, it doesn’t matter much so just write naturally as you want to and sprinkle some keywords in between.
Don’t take these metrics seriously????

6. Take image SEO seriously
In the past, I wasn’t taking it seriously but after that, I realized my mistake and now I am optimizing my blog images to rank on Google images.
Here is the image SEO checklist that you should follow:
7. Add images, graphics, memes and more to spice up your blog posts
Tell me would you like to read a blog post that doesn’t contain any images, videos, or graphics at all.
Just a bland piece of text.
If you ask me then I won’t read that blog post as it would be very boring to read.

And that is the reason why bloggers add a ton of graphics, images, memes, videos, and more to spice up their content up.
It gives your readers a variety of content to consume which increases the dwell time of your blog which is a super important ranking factor.
For making your images you could use the Awesome screenshot plugin, for videos you could use YouTube, and for memes, you can make it by Meme generator.
8. Add both external and internal links
Internal links and external links both are integral parts of SEO.
However, still, the so-called SEOs give a lot of value to internal links but on the other hand, don’t recommend the external links at all.
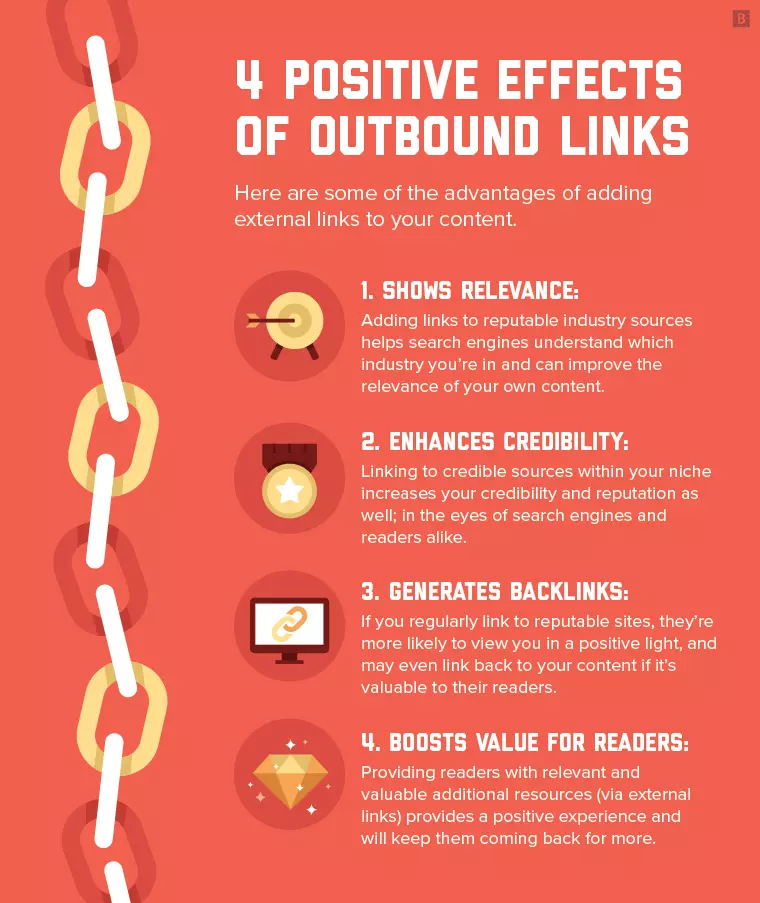
But I would highly recommend you to add both of them to your blog posts.
Here are some things you should keep in mind while adding internal and external links to your blog post:
9. Try persuasive writing
Persuasiveness is a skill that every blogger should have in their writing because it helps your audience to believe in your point and can help you get more affiliate sales.
You can read my persuasive writing tips article to know how you can make your blog posts persuasive.
10. Add a killer headline and meta description
Adding a great headline and meta description to your blog post can be a rank booster.
As it increases the CTR of your website which helps your website to get more organic traffic without increasing its rankings.
Here are some tips to craft great headlines for your blog posts:
To craft an awesome meta description for your blog you can read my blog description guide.
Also, one thing you should remember is that you shouldn’t go over clickbaity in your blog title and description.
Only promise the thing which your readers would actually get through your article.

Step 12 – How to build high quality backlinks for your blog?
Creating great content for your blog was enough in blogging some years back.
However, in today’s time, along with creating awesome content you have to put your time to do link building for your website too.
Here are my three favorite techniques to make backlinks for your blog as a beginner:
1. Guest Posting
This is the #1 method that I use to build backlinks for my blog.
I regularly guest post on various blogs in my niche it helps me get one or two do-follow backlinks for my blog.
For example here is a guest post by me on the Bishnu Mahali blog.

But the important thing is how can you do guest posting;
Step 1 – First you have to find guest posting opportunities for your blog.
For that go to Google and search for ‘keyword + write for us’ or ‘keyword + guest post’.
For example, I searched ‘blogging + write for us’ on Google, and here are all the blogs that I can guest post on.

Step 2 – Next after finding a guest post opportunity follow the owner of that blog on various social media and share their blog posts mentioning them.
Keep doing that for around 1 week and you would get into their eyes.
You can even call them on your blog for an interview it would help you build a strong connection with them.
Step 3 – After that send them an email at their email address which you would get on their write for us page. Here is an email example that you can take as an inspiration while pitching for guest posts.
Step 4 – Write a great guest post following all the guidelines present on their write for us page.

Step 5 – Send them your article, wait for the approval and publishing of your article.
That’s the process that I use every time I want to do guest posting.
2. Blog Commenting
Blog commenting is dead! Yes, SEOs say this but it is not true yet.
Yes, your link in comments would be nofollow and no link juice would be passed from there.
However, there are other benefits of doing blog commenting.
First, it helps Google crawler to crawl your blog post fast, second, it helps you increase your website’s brand reach and helps your website to get some referral traffic.
I personally do it and it helps my blog to get some referral traffic.

Also, not only me but Anil Agarwal and many other pro bloggers still use this tactic despite being called dead for several years.
So, do blog commenting for SURE!
3. Blogger Roundup
Blogger roundup is a blog post where a lot of popular bloggers give their opinions and tips on a certain topic.
I have also created a blogger roundup on how to drive traffic as a newbie where I invited 10+ pro bloggers.
To get the opportunity to be featured in a blogging roundup you first have to be active on social media and post valuable content there in the form of tips, tricks, hacks, and more.
Also share blog posts of other bloggers in your niche to develop a friendship with them.
Do it regularly for some time and you would soon be invited to take part in their blogger’s roundup.
Along with that, you can also search for other bloggers roundup by using these strings on Google:
After finding the link roundups you could get links from you then have to send them a mail asking for a link.
Here is an email template that you could use.

Also, you could make your own bloggers roundup which would help you get backlinks to it naturally.
Note – Sorry for disturbing you! Bookmark this page if you don’t want to read further right now!
Step 13 – How to promote your blog like a pro?
Promoting your blog posts is super essential especially when your blog is in a budding stage.
It helps you get initial traffic to your blog and helps you build your core audience.
So, here are my four favorite ways which I use to promote my blog posts:
1. Be active on social media

Being active on social media is one of the best things that I have done in my blogging career.
It helped me build an audience through my Facebook group and helped me make a lot of blogging friends.
Here are some of my blogging friends who have helped me a lot in my blogging journey:
But the question is how you can do the same?
First I would highly recommend you to be active on any one social media and post valuable content regularly there.
For example, I post a lot of content on Twitter like threads, short posts, articles, and more.
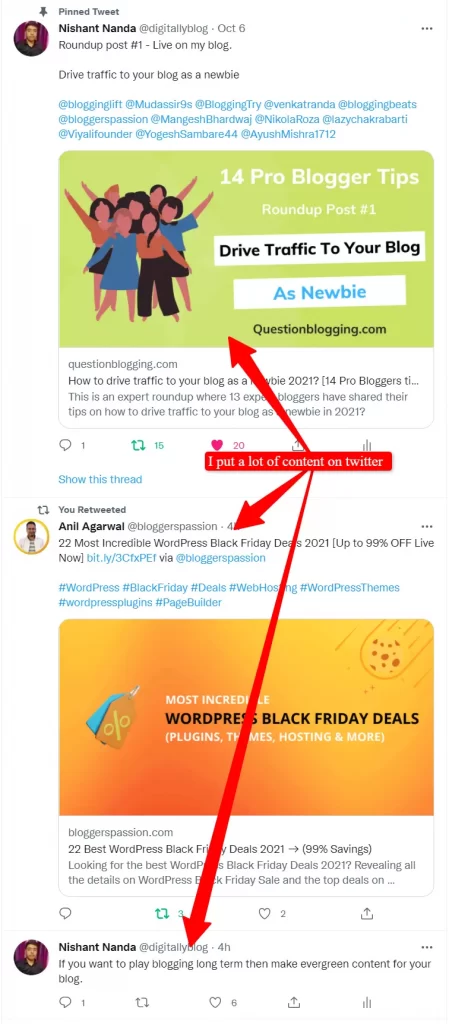
Next connect with bloggers in your niche by commenting on their social media posts, messaging them, and having a conversation with them.
Build a true friendship with other bloggers!
Also, respond to every comment that you get politely and solve their problems which would turn them into your regular blog audience.
And that’s how I have used social media to expand my blog reach.
2. Make an email list
An email list is one of the oldest and still the most viable methods to promote your blog posts.
The average value of an email subscriber is $48.87 and the ROI of email marketing is 36:1.

Gigantic!
You can easily add an email form on your homepage or into your blog posts and tell your readers why they should enroll in your email list.
If you are low on budget then you can use Getresponse to build your email list for FREE up to 500 email subscribers.
You can easily build your email list, automate it, use autoresponders, and a lot more by using Getresponse.
So, what are you waiting for? Start your email journey with Getresponse!
3. Try some paid ways
Want to drive traffic to your blog super fast?
If yes then you can also try some paid methods like Facebook ads or Google ads to promote your website.
But the catch in this method is that you have to invest some of your money to run ads on these platforms.
I have used Facebook ads in the past to drive traffic to my blog which was quite economical if you are doing retargeting by using the Facebook pixel.
To know how to promote your blog post with Facebook ads you can watch this video by website learners.
4. Be active on Quora
Quora is a goldmine of blog post ideas but you can also use it to drive initial traffic to your blog.
For that, you first have to find questions in your niche. For example, I am searching for questions about website traffic.
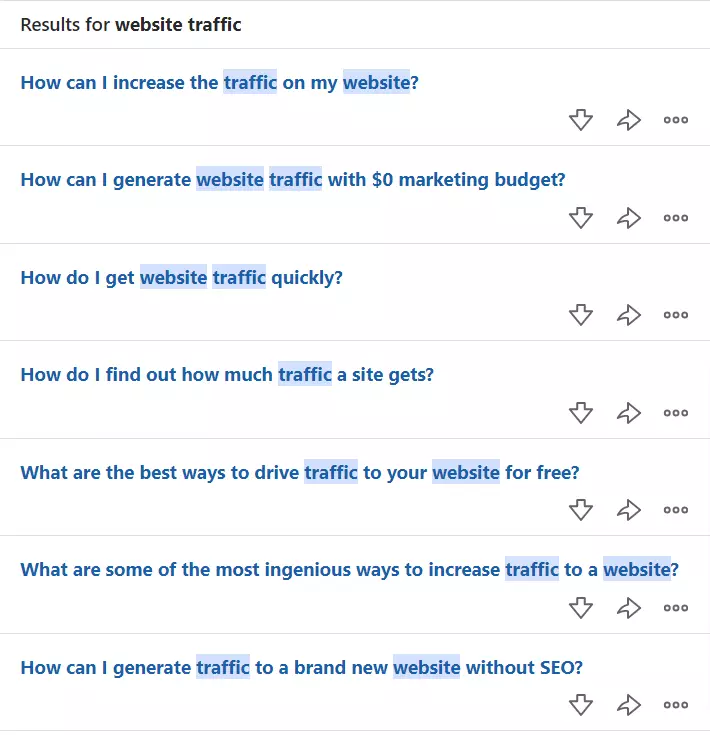
Here are all the questions regarding website traffic you can pick the one which you like the most and answer it.
I personally pick questions that have at most half the answers to the number of followers of that question.
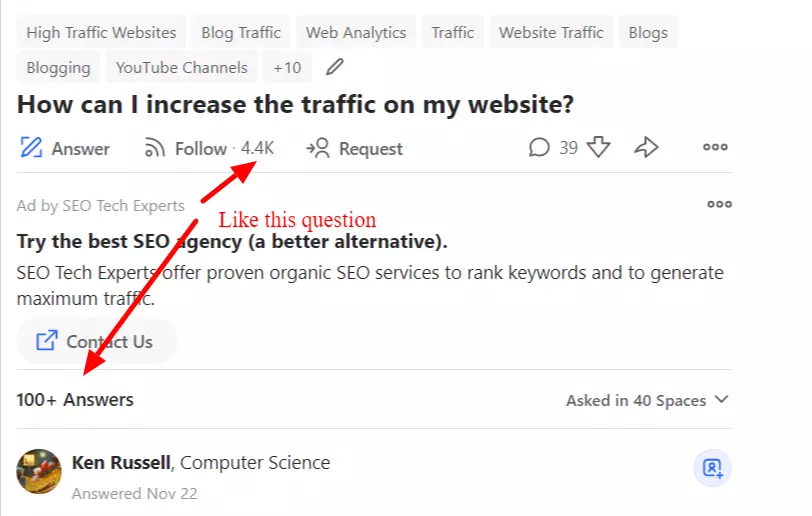
These are the questions that people are searching for and have low competition as well.
Also, you can go to the Quora profile of any blogger in your niche and answer the questions they are answering.
It is a hack I always use when I am not able to find great questions to answer on Quora.
Step 14 – Ways to make money from your blog in 2022
In today’s time, there are thousands of ways to make money from your blog.
However, if I start telling you all of them then it would confuse the hell out of you.
So, here are my three favorite ways that you can use to make money from your blog:
1. Affiliate Marketing
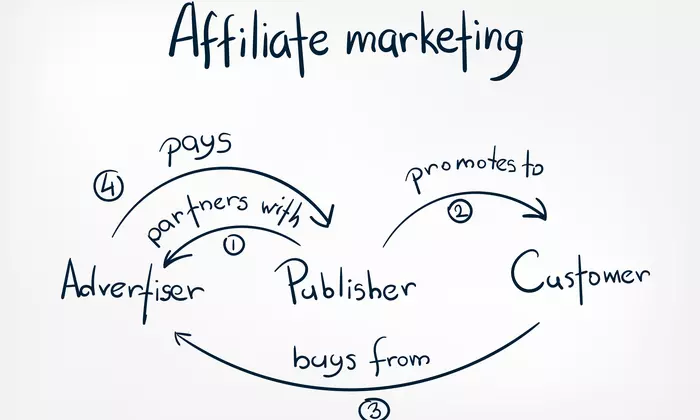
Affiliate marketing is one of the most used methods by bloggers to monetize their blogs.
To do affiliate marketing from your blog you first have to make an account on any of the affiliate programs for example Amazon affiliate program.
Then you have to craft an amazing review or comparison post where you have to add links to the products you are promoting.
And when your readers buy something from your link then it would give you a commission without charging your readers anything extra.

It can be a huge one like $200 per sale or can be a small one which you get in the Amazon affiliate program.
However, still, I recommend you should start with Amazon affiliate marketing which is best for beginners.
And eventually when you know the basics of affiliate marketing properly then you can try your hands in different affiliate programs like CJ, ShareASale, and more
2. Google Adsense or other ad network

This is another blogger’s favorite method to monetize their blogs.
In this method, you first have to choose an ad network which you want to monetize your blog with for example Google AdSense
Next, you have to create content on your blog, make important pages, add proper navigation, and a lot more according to the guidelines of that ad network so that your blog would get approved for it.
After doing all this you have to apply for that ad network and wait for some days or weeks until the ad network accepts or rejects your application.
If you get accepted then connect your account with your blog, place ads on your blog like in the sidebar, in content, etc and earn money from it.
But one thing you should keep in mind is that to earn decent money from Google Adsense you need a large amount of traffic to your blog.
However, on the other hand in Affiliate marketing, you can earn a decent income with very little traffic.
3. Making your own product

You can even make your own product like ebooks, courses, and more to monetize your blog.
This method is not for you if you don’t know much about your blog niche but if you have ample knowledge of your blog niche then you can use this tactic to monetize your blog with it.
In this method, you first have to decide which premium product you are going to make for example an eBook.
Next, you have to make it and market it by adding its link to your ranking blog posts.
Also, don’t forget to mention some of its benefits.
And if someone buys your product then the full amount of that product would go straight into your pocket.
Also, you can make a free ebook or course, within that you can mention some products related to the topic, give its affiliate link and when someone buys from it then you would get an affiliate commission.
Bonus! 7 Personal Tips for starting a profitable blog in 2022
So, at last here are my 7 personal tips that I want to give you which would help you to start your own profitable blog:
1. Be freaking consistent
Consistency is the key to get success in any field.
If you are not consistent then you will get a late success as compared to the people who are consistent in their field.
I know that sometimes it is really hard to be consistent and that’s ok but just try your level best to be consistent in blogging.
2. Put your head and work
There is a lot of noise in the blogging industry where some fake gurus would be selling you cheap tips, tricks, and hacks to earn money fast.
And if you follow them then you would earn nothing but would waste a lot of your time.
I have been there too and that is the reason why I have struggled so much in this blogging industry because I was listening to the wrong people.
There is no quick rich scheme in this world which can help you earn money overnight.
To learn a new skill like blogging takes time, passion, and consistency.
Also, listen to bloggers who are giving you real knowledge, not selling some cheap money-making hacks like Anil Agarwal, Brian Dean, Matthew Woodward, Mangesh Bhardwaj, Ankit Singla, and more
3. Don’t start too many blogs
This is the mistake that every new blogger do in this industry that they open a lot of blogs seeing other bloggers and get success in none of them.
I have done that too. I had opened in total 6 blogs and failed in almost all of them.
So, if you really want to get success in blogging then at the start open a single blog, post quality content to it and when it starts making you money then you can think of opening any other blog.
But remember to do it slowly and steadily.
4. Start with single social media platform
Social media is a great hub for promoting your blog content and getting some traffic through it.
But that doesn’t mean that you should start posting content on every possible social media especially if you are a new blogger with no team.
Yes, pro bloggers can be active on every social media platform and create content for it because they have a team to edit their videos, post content, and a lot more.
But as a single person, you can’t do that.
So I would advise you to be freaking consistent on any one social media platform rather than going for all of them at once.
Create content for it, share your blog posts, and connect with other bloggers on a single social media platform.
It would help you maintain consistency on your blog and also do the promotion work side-by-side without getting burned out.
5. Grow your email list from start
As I have previously mentioned that the Email list is one of the biggest assets for any blogger out there.
You can drive traffic through it to your blog, drive sales and conversions to your business, and a lot more.
So, I would recommend you to start building your email list from the very beginning.
You can use that for FREE by signing up for the free account of Getresponse.
6. Give, Give, Give, then Take
Yes, I know that you want to earn money from your blog.
And it’s not a bad thing because I also want to earn money from my blog.
But the thing which leads 95% of bloggers to leave blogging is because they were only thinking about earning money for themself not on providing great content for their readers as well.
So, first craft awesome content for your readers before expecting any affiliate sale from them.
6. Take a chill pill bro
At last, I would tell you to take a chill pill.
Don’t go heavy on blogging all the time take care of your mental health, spend some time with your family and enjoy life.
It would help you to be productive in your blogging time and won’t burn you off.
I would recommend you to create a to-do list for your day it would help you plan your blogging tasks and would protect you from burning out.
Continue Reading
Frequently Asked Questions
Over to you!
Blogging is a business that takes time to flourish and give results.
So, if you really want to make money from blogging then put your time, money, and efforts into creating a wonderful blog.
Now you tell me in the comments that do you have a blog or are you planning to start it in the future?
Also, share this massive guide on social media so it can reach more newbie bloggers out there.
Note – Bookmark this guide so you can use it for future reference!


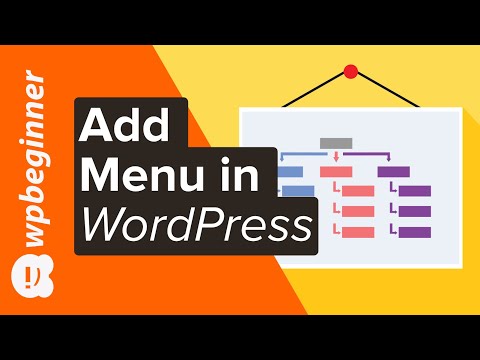


![How To Setup Cloudflare DNS [FAST] Add Your Domain to Cloudflare DNS Server](https://questionblogging.com/wp-content/cache/flying-press/oBONjM3OXuc-hqdefault.jpg)
